This project uses an Arduino with an 8×8 LED display and a soil moisture sensor to take care of plants. When the soil is dry, a sad face shows on the display, and the water pump starts to water the plant. When the soil is wet enough, a happy face shows on the display, and the water pump stays off. This helps make sure plants get just the right amount of water they need to grow well.
Components Required
- Arduino Board (e.g., Arduino Uno) – 1
- 8×8 LED Matrix Display – 1
- Soil Moisture Sensor – 1
- MOSFET (e.g., IRF540N) – 1
- Water Pump Motor – 1
- Breadboard – 1
- Resistors (e.g., 10kΩ for the gate of the MOSFET) – 1
- Diode (e.g., 1N4007 for flyback protection) – 1
- Power Supply for the Water Pump -12V
- Connecting Wires
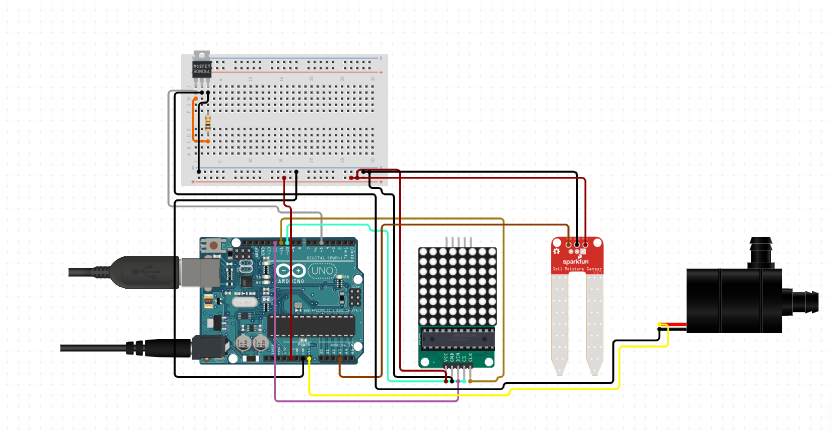
Connections
- Soil Moisture Sensor
- VCC: Connect to Arduino 5V
- GND: Connect to Arduino GND
- Analog Output (A3): Connect to Arduino analog input pin A3
- 8×8 LED Matrix Display
- Connect the LED matrix to the pin number 10,11,12 of the Arduino
- MOSFET
- Drain (D): Connect to the negative terminal of the water pump motor
- Source (S): Connect to Arduino GND and the negative terminal of the power supply for the water pump
- Gate (G): Connect to the resistor (10kΩ) and another end of the resistor is connected to the source.
- Water Pump Motor
- Positive Terminal: Connect to the positive terminal of the power supply for the water pump
- Negative Terminal: Connect to the drain of the MOSFET
#include <LedControl.h>

// Define pins for the 8x8 LED matrix
const int DIN_PIN = 12;    // Data in pin
const int CLK_PIN = 11;    // Clock pin
const int CS_PIN = 10;     // Chip select pin

LedControl lc = LedControl(DIN_PIN, CLK_PIN, CS_PIN, 1); // Initialize the LED matrix

// Define pin for soil moisture sensor
const int soilMoisturePin = A3; // Analog pin for soil moisture sensor

// Define threshold values for soil moisture (adjust as needed)
const int dryThreshold = 700;   // Soil moisture value indicating dry soil
const int wetThreshold = 300;   // Soil moisture value indicating wet soil

// Define motor pump pin
const int motorPin = 5;  // Digital pin for motor pump control

void setup() {
  lc.shutdown(0, false); // Wake up the display
  lc.setIntensity(0, 8); // Set brightness level (0 is the max brightness)
  lc.clearDisplay(0);   // Clear the display

  pinMode(motorPin, OUTPUT); // Motor pump pin as output

  Serial.begin(9600); // Initialize serial communication for debugging
}

void loop() {
  int soilMoisture = analogRead(soilMoisturePin); // Read soil moisture sensor

  // Print soil moisture value (for debugging purposes)
  Serial.print("Soil Moisture: ");
  Serial.println(soilMoisture);

  // Display appropriate face on LED matrix based on soil moisture level
  if (soilMoisture < wetThreshold) {
    displayHappyFace();
    digitalWrite(motorPin, LOW); // Turn off motor pump
  } else if (soilMoisture > dryThreshold) {
    displaySadFace();
    digitalWrite(motorPin, HIGH); // Turn on motor pump
  }

  delay(1000); // Adjust delay as needed between sensor readings
}

void displayHappyFace() {
  byte happyFace[8] = {
    B00000000,
    B01100110,
    B01100110,
    B00000000,
    B10000001,
    B01000010,
    B00111100,
    B00000000
  };

  for (int i = 0; i < 8; i++) {
    lc.setRow(0, i, happyFace[i]); // Display happy face on LED matrix
  }
}

void displaySadFace() {
  byte sadFace[8] = {
    B00000000,
    B01100110,
    B01100110,
    B00000000,
    B00000000,
    B01111110,
    B00000000,
    B00000000
  };

  for (int i = 0; i < 8; i++) {
    lc.setRow(0, i, sadFace[i]); // Display sad face on LED matrix
  }
}