Building a weather monitoring system using Arduino Uno, MQ135 air quality sensor, DHT11 temperature and humidity sensor, and an I2C LCD display could be a fun and educational project. Here’s a basic description of how you can set it up:
1. Arduino Uno: This will be the central controller of your weather system. It will read data from the sensors and display it on the LCD screen.
2. MQ135 Air Quality Sensor: This sensor measures the concentration of ammonia, benzene, smoke, CO2, etc., in the air. It’s connected to one of the analog pins of the Arduino Uno.
3. DHT11 Temperature and Humidity Sensor: This sensor measures temperature and humidity. It’s also connected to the Arduino Uno, typically via a digital pin.
4. I2C LCD Display: An I2C LCD display is used to show the data collected from the sensors. The I2C interface simplifies the wiring since it only requires two pins for communication with the Arduino Uno.
Here’s a brief overview of how the system works:
5. Wiring: Connect the sensors and LCD display to the Arduino Uno according to their respective pin configurations. Make sure to use appropriate pull-up resistors for the I2C communication.
6. Coding: Write the Arduino sketch (code) to initialize the sensors, read data from them, and display it on the LCD screen. You’ll need to use libraries for each sensor to simplify the coding process. For example, you can use the “DHT.h” library for the DHT11 sensor and the “LiquidCrystal_I2C.h” library for the LCD display.
7. Data Acquisition: In the code, you’ll continuously read data from the sensors at regular intervals. For example, you might read temperature and humidity every few seconds and air quality data less frequently.
8. Display: Once you’ve collected the data from the sensors, display it on the LCD screen. You can format the display to show temperature, humidity, air quality, and any other relevant information.
9. Optional: You can add features like data logging to an SD card, connecting the system to the internet for remote monitoring, or integrating additional sensors for more comprehensive weather monitoring.
Once you’ve completed these steps, you’ll have a functional weather monitoring system using Arduino Uno, MQ135, DHT11, and an I2C LCD display. It’s a great project for learning about sensors, microcontrollers, and programming.
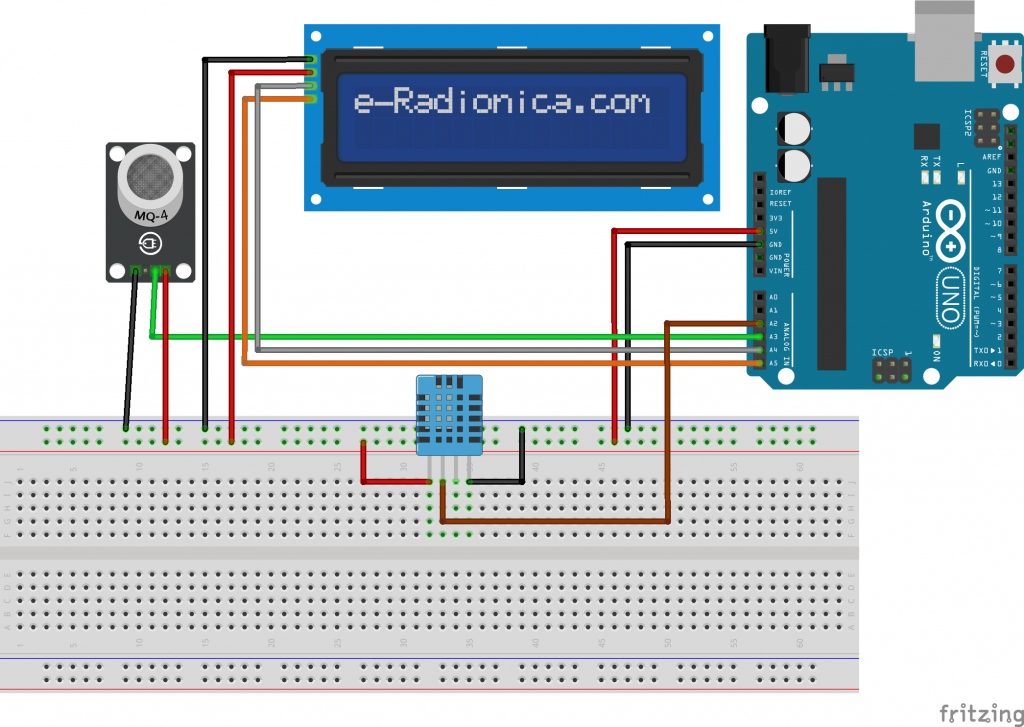
CIRCUIT DIAGRAM
CODE
#include<DHT.h>
#define DHTTYPE DHT11
#define dht_pin A2
DHT dht(dht_pin,DHTTYPE);
#include <Wire.h>
#include <LiquidCrystal_I2C.h>
LiquidCrystal_I2C lcd(0x27,16,2);  // set the LCD address to 0x27 for a 16 chars and 2 line display
int AQ= A0;
int AQValue;
int digital_sensor;
int sensorThres = 180;


void setup() {
  Serial.begin(9600);
    dht.begin();
  lcd.init();                      // initialize the lcd
  lcd.init();
  // Print a message to the LCD.
  lcd.backlight();

}

void loop() {
 AQValue = (analogRead(AQ));
Serial.print("AQ=");
Serial.println(AQValue);
lcd.setCursor(0,1);
    lcd.print("AQ=");
    lcd.setCursor(4,1);
   lcd.print(AQValue);
 float T =dht.readTemperature();
 float H =dht.readHumidity();
  if (isnan(T) || isnan(H))
    {
        Serial.println("Failed to read from DHT");
    }
    else {
      Serial.print("Temperature = ");
  Serial.print(T);
  lcd.setCursor(0,0);
    lcd.print("T=");
    lcd.setCursor(2,0);
   lcd.print(T);
  Serial.print("C");
  Serial.print(" ");
  Serial.print("Humidity =");
  Serial.print(H);
  Serial.print("%");
  lcd.setCursor(9,0);
    lcd.print("H=");
    lcd.setCursor(11,0);
   lcd.print(H);

  Serial.println("");
  delay(500);


    }
}


