Water-Efficient smart irrigation system is designed to optimize water use in agricultural settings by automating the watering process based on soil moisture levels. This system integrates several key components: PVC pipes, an Arduino Uno, soil moisture sensors, a relay module, a water pump, and a breadboard for connections.
The system begins with soil moisture sensors strategically placed in the soil. Soil moisture sensors continuously monitor the soil’s moisture content. When the soil is detected as dry, indicating that the plants need water, the sensors send a signal to the Arduino Uno.
The Arduino Uno acts as the central processing unit for the system. Upon receiving the dry soil signal from the sensors, the Arduino sends a command to the relay module. The relay module, which acts as a switch, is then activated and allows electrical power to flow to the water pump.
The water pump is connected to the PVC pipes, which are laid out to direct water to the crops. When the pump is turned on, it begins to pump water through the PVC pipes. To ensure even water distribution and prevent water from accumulating in one spot, a servo motor is used to rotate the pipe in a loop. This rotation ensures that water is spread evenly across the field, reducing the risk of crop damage due to waterlogging.
The duration of watering can be easily adjusted by modifying the code on the Arduino. This flexibility allows for tailored watering schedules that match the specific needs of different crops or varying weather conditions.
All components, including the relay module and servo motor, are connected using a breadboard, which facilitates easy wiring and configuration adjustments. This smart irrigation system not only conserves water but also promotes healthier plant growth by providing consistent and even watering, thereby enhancing overall agricultural efficiency.
Components Required:-
- PVC pipes
- Arduino Uno
- Soil moisture sensors
- Relay module
- Water pump
- Breadboard and jumper wires
Components and Descriptions:
- PVC Pipes: Carry water to the plants.
- Arduino Uno: Control the system.
- Soil Moisture Sensors: Measure soil moisture levels.
- Relay Module: Switch the water pump on and off.
- Water Pump: Pump water to the plants.
- Breadboard: Make circuit connections without soldering.
- Jumper Wires: Connect components on the breadboard.
- External Power Supply: Provide power to the water pump.
Connections:
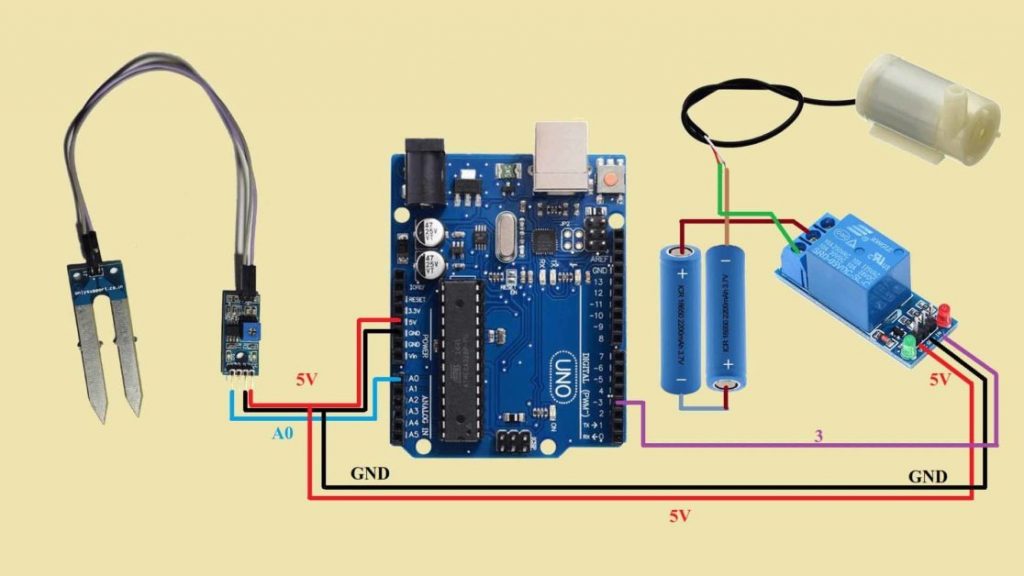
- Soil Moisture Sensor:
- VCC to Arduino 5V
- GND to Arduino GND
- AO to Arduino A0
- Relay Module:
- VCC to Arduino 5V
- GND to Arduino GND
- IN1 to Arduino Digital Pin 3
- Water Pump:
- One terminal to COM on relay
- Other terminal to negative terminal of the external power source
- External Power Supply:
- Negative terminal to one terminal of the water pump
- Positive terminal to NO on relay
int moisture_sensor = A0; // Define the analog pin connected to the moisture sensor
int moisture_level; // Declare the variable for the moisture level

void setup()
{
    pinMode(3, OUTPUT); // Set pin 3 as an output
    Serial.begin(9600); // Start serial communication at 9600 baud rate
    Serial.println("Getting sensor reading");
    delay(2000); // Wait for 2 seconds
}

void loop()
{
    moisture_level = analogRead(moisture_sensor); // Read the value from the moisture sensor
    moisture_level = map(moisture_level, 550, 10, 0, 100); // Map the sensor value to a percentage
    Serial.print("Moisture level: ");
    Serial.print(moisture_level);
    Serial.println("%");

    if(moisture_level < 10)
    {
        digitalWrite(3, HIGH); // Turn on the output if moisture level is below 10%
    }
    else
    {
        digitalWrite(3, LOW); // Turn off the output if moisture level is 10% or higher
    }

    delay(100); // Wait for 100 milliseconds before the next loop
}


