Description:
The “Voice of Mute” project aims to bridge communication gaps for individuals with speech impairments by translating sign language into audible speech using an Arduino-based system. This project utilizes flex sensors, an Arduino microcontroller, and a sound playback module.
Flex sensors are attached to a glove worn by the user. These sensors detect the bending of fingers corresponding to various sign language gestures. The Arduino reads the resistance changes from the flex sensors and interprets the specific sign being made. Each unique combination of sensor readings correlates to a predefined sign language gesture stored in the Arduino’s program.
Upon recognizing a gesture, the Arduino triggers the sound playback module, which contains pre-recorded audio files for each gesture. The sound playback module plays the corresponding audio file through a speaker, converting the sign language gesture into spoken words. This real-time translation facilitates communication for individuals who are mute, allowing them to interact more effectively with those who do not understand sign language.
The project’s components include:
- Arduino microcontroller
- Flex sensors
- Sound playback module
- Speaker
- Power supply
By leveraging simple electronics and programming, this project provides an innovative, cost-effective solution to enhance communication for the speech-impaired, promoting inclusivity and understanding in diverse settings.
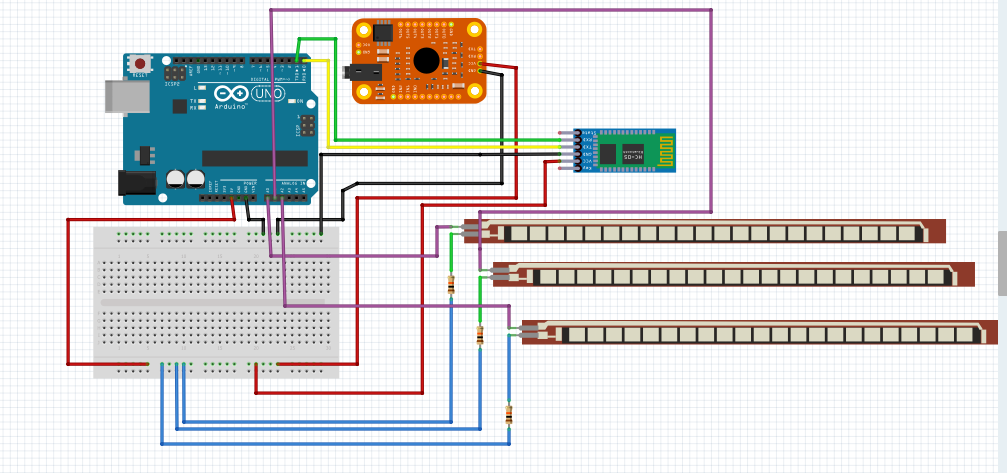
Components Required:
- Arduino
- Flex Sensor X3
- Sound Play Back Module
- Bluetooth Module
- Connecting Wires [Male to Male X2, Male to Female X12]
Components and Connections:
- Arduino Board (e.g., Arduino Uno)
- Flex Sensors (3 pieces)
- Sound Playback Module (e.g., APR9600)
- Bluetooth Module (e.g., HC-05)
- Power Supply
Connection Details:
Flex Sensors:
- Flex Sensor 1:
- One end connected to Analog Pin A0.
- The other end connected to GND (ground).
- A pull-down resistor (e.g., 10k ohm) should be connected between the analog pin (A0) and GND.
- Flex Sensor 2:
- One end connected to Analog Pin A1.
- The other end connected to GND.
- A pull-down resistor should be connected between the analog pin (A1) and GND.
- Flex Sensor 3:
- One end connected to Analog Pin A2.
- The other end connected to GND.
- A pull-down resistor should be connected between the analog pin (A2) and GND.
Sound Playback Module (APR9600):
- PLAYE Pin of APR9600:
- Connect to Digital Pin 7 on the Arduino.
- VCC of APR9600:
- Connect to 5V on the Arduino.
- GND of APR9600:
- Connect to GND on the Arduino.
- Speaker:
- Connect the speaker outputs to the respective outputs of the APR9600 module.
Bluetooth Module (HC-05):
- RX of HC-05:
- Connect to Digital Pin 10 (TX) on the Arduino.
- TX of HC-05:
- Connect to Digital Pin 11 (RX) on the Arduino.
- VCC of HC-05:
- Connect to 5V on the Arduino.
- GND of HC-05:
- Connect to GND on the Arduino
#include <SoftwareSerial.h>

#define FLEX_SENSOR_1 A0
#define FLEX_SENSOR_2 A1
#define FLEX_SENSOR_3 A2
#define PLAYE_PIN 7

SoftwareSerial bluetooth(10, 11); // RX, TX for Bluetooth

void setup() {
  pinMode(PLAYE_PIN, OUTPUT);
  digitalWrite(PLAYE_PIN, LOW);  // Ensure PLAYE is LOW initially
  pinMode(FLEX_SENSOR_1, INPUT);
  pinMode(FLEX_SENSOR_2, INPUT);
  pinMode(FLEX_SENSOR_3, INPUT);
  bluetooth.begin(9600); // Initialize Bluetooth module
  Serial.begin(9600);    // Initialize Serial Monitor for debugging
}

void loop() {
  int flex1 = analogRead(FLEX_SENSOR_1);
  int flex2 = analogRead(FLEX_SENSOR_2);
  int flex3 = analogRead(FLEX_SENSOR_3);

  // Debugging prints
  Serial.print("Flex1: ");
  Serial.print(flex1);
  Serial.print(" Flex2: ");
  Serial.print(flex2);
  Serial.print(" Flex3: ");
  Serial.println(flex3);

  // You may need to calibrate the threshold values based on your flex sensors
  if (flex1 > 600) {
    playMessage(1); // Play message 1
  } else if (flex2 > 600) {
    playMessage(2); // Play message 2
  } else if (flex3 > 600) {
    playMessage(3); // Play message 3
  }

  delay(500); // Small delay to avoid bouncing
}

void playMessage(int messageNumber) {
  // You may need to adjust the APR9600 control based on your wiring and module
  digitalWrite(PLAYE_PIN, HIGH); // Start playing
  delay(1000);                   // Hold for 1 second to ensure the message starts
  digitalWrite(PLAYE_PIN, LOW);  // Stop playing

  // Send message number to Bluetooth
  bluetooth.print("Playing message ");
  bluetooth.println(messageNumber);
}

//has context menu