The Voice-Controlled Purifier Car is a sophisticated prototype designed to purify air based on voice commands, leveraging advanced technologies and components for effective functionality:
Components:
1. Arduino Uno Microcontroller:
· Acts as the brain of the system, receiving and processing voice commands through a voice recognition module and controlling the operations of the purifier car.
2. Bluetooth Module:
· Facilitates wireless communication between the purifier car and a smartphone or tablet, enabling remote control and monitoring via a dedicated mobile app.
3. DC Motors and Motor Driver:
· Utilized for propulsion and precise movement control of the purifier car. These components ensure the car can navigate indoor spaces efficiently while purifying the air.
4. DC Fan and Air Filter:
· The DC fan is coupled with an air filter to effectively remove airborne particles, dust, pollen, and other contaminants from the air. It operates based on commands received from the Arduino, enhancing indoor air quality.
5. Voice Recognition Module:
· Integrates with the Arduino to interpret voice commands issued by the user. It allows for hands-free operation, enabling users to control the purifier car simply by speaking commands such as “start,” “stop,” or “increase fan speed.”
Functionality:
· Voice Control Interface:
· Users interact with the purifier car through voice commands, which are processed by the Arduino and executed accordingly. This intuitive interface enhances user convenience and accessibility.
· Air Purification Operation:
· Upon receiving a command to start purifying, the Arduino activates the DC fan equipped with the air filter. The fan draws air through the filter, trapping particles and pollutants, thereby improving the air quality in the vicinity.
· Remote Monitoring and Control:
· The Bluetooth module enables real-time monitoring of air quality parameters and purifier status via a mobile app. Users can adjust settings and receive notifications about filter replacement or maintenance needs remotely.
· Navigation and Mobility:
· Equipped with DC motors and a motor driver, the purifier car can navigate autonomously or be directed manually to different areas within a space, ensuring comprehensive air purification coverage.
Applications:
· Indoor Air Quality Improvement:
· Ideal for homes, offices, and public spaces where maintaining clean and healthy indoor air is essential for occupant well-being and productivity.
· Smart Home Integration:
· Integrates seamlessly into smart home ecosystems, offering a hands-free approach to managing indoor air quality alongside other connected devices.
· Healthcare Settings:
· Suitable for use in hospitals, clinics, and care facilities to reduce airborne pathogens and allergens, creating a safer environment for patients and staff.
Conclusion:
The Voice-Controlled Purifier Car represents a cutting-edge solution combining robotics, voice recognition technology, and air purification capabilities. By utilizing Arduino control, Bluetooth connectivity, and effective filtration mechanisms, it provides an innovative approach to enhancing indoor air quality while offering user-friendly operation through voice commands. This prototype not only demonstrates technological advancement but also addresses the growing demand for smarter, more efficient solutions in environmental health and automation.
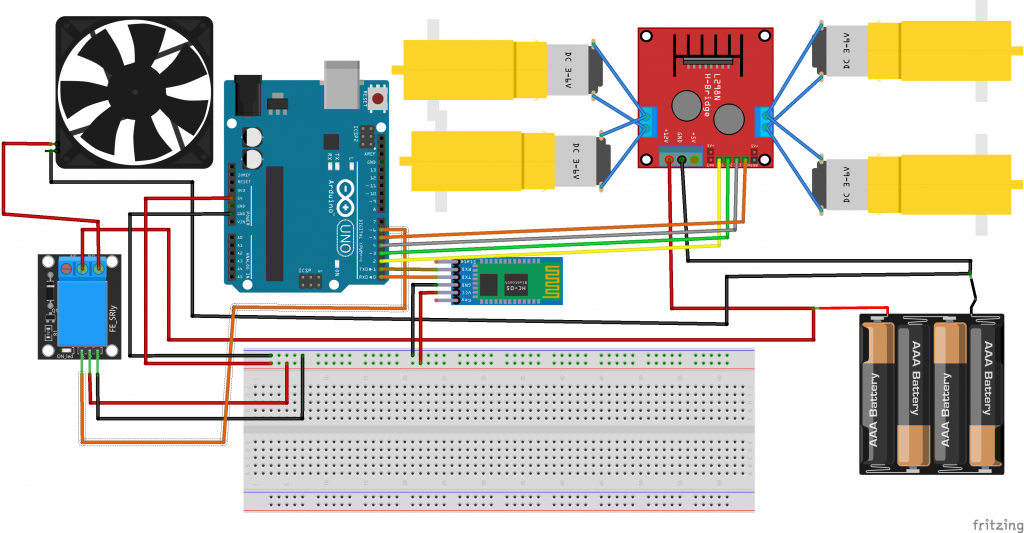
CIRCUIT DIAGRAM
CODE
String voice;


int fanrelay=6;
int motor1pin1 = 2;
int motor1pin2 =3;
int motor2pin1 = 4;
int motor2pin2 = 5;


void setup()
{                                            // put your setup code here, to run once:
  pinMode(motor1pin1, OUTPUT);
  pinMode(motor1pin2, OUTPUT);
  pinMode(motor2pin1, OUTPUT);
  pinMode(motor2pin2, OUTPUT);
    pinMode(fanrelay, OUTPUT);

  Serial.begin(9600);

}

  int redVal;
  int greenVal;
  //int blueVal;


void loop() {

  while (Serial.available())   //Check if there is an available byte to read
  {
  delay(10);                   //Delay added to make thing stable
  char c = Serial.read();      //Conduct a serial read
  if (c == '#') {break;}       //Exit the loop when the # is detected after the word
  voice += c;                  //Shorthand for voice = voice + c
  }

  if (voice.length() > 0) {
    Serial.println(voice);
  //----------Control Multiple Pins/ LEDs----------//
  if(voice == "purify")//                                FOR RED COLOUR OF THE LED
     {
digitalWrite(fanrelay,HIGH);
     }
       if(voice == "purify stop")//                                FOR RED COLOUR OF THE LED
     {
digitalWrite(fanrelay,LOW);
     }
       if(voice == "forward")//                                FOR RED COLOUR OF THE LED
     {
        digitalWrite(motor1pin1, HIGH);

        digitalWrite(motor1pin2, LOW);

        digitalWrite(motor2pin1, LOW);
        digitalWrite(motor2pin2, HIGH);
        delay(1000);
         digitalWrite(motor1pin1, LOW);
        digitalWrite(motor1pin2, LOW);

        digitalWrite(motor2pin1, LOW);
        digitalWrite(motor2pin2, LOW);

     }

   if(voice == "backward")//                              FOR GREEN COLOUR OF THE LED !
     {
        digitalWrite(motor1pin1, LOW);
        digitalWrite(motor1pin2, HIGH);

        digitalWrite(motor2pin1, HIGH);
        digitalWrite(motor2pin2, LOW);
delay(1000);
         digitalWrite(motor1pin1, LOW);
        digitalWrite(motor1pin2, LOW);

        digitalWrite(motor2pin1, LOW);
        digitalWrite(motor2pin2, LOW);
           }
     if(voice == "turn right")//                              FOR GREEN COLOUR OF THE LED !
      {
        digitalWrite(motor1pin1, LOW);
        digitalWrite(motor1pin2, LOW);
        digitalWrite(motor2pin1, LOW);
        digitalWrite(motor2pin2, HIGH);
    delay(500);
         digitalWrite(motor1pin1, LOW);
        digitalWrite(motor1pin2, LOW);
        digitalWrite(motor2pin1, LOW);
        digitalWrite(motor2pin2, LOW);
         }
        if(voice == "turn left")//                              FOR GREEN COLOUR OF THE LED !
    {
        digitalWrite(motor1pin1, HIGH);
        digitalWrite(motor1pin2, LOW);
        digitalWrite(motor2pin1, LOW);
        digitalWrite(motor2pin2, LOW);
      delay(500);
         digitalWrite(motor1pin1, LOW);
        digitalWrite(motor1pin2, LOW);
        digitalWrite(motor2pin1, LOW);
        digitalWrite(motor2pin2, LOW);
        }
         if(voice == "stop the car")//                              FOR GREEN COLOUR OF THE LED !
     {
        digitalWrite(motor1pin1, LOW);
        digitalWrite(motor1pin2, LOW);

        digitalWrite(motor2pin1, LOW);
        digitalWrite(motor2pin2, LOW);


     }


voice="";                                                       //Reset the variable after initiating
}
}


