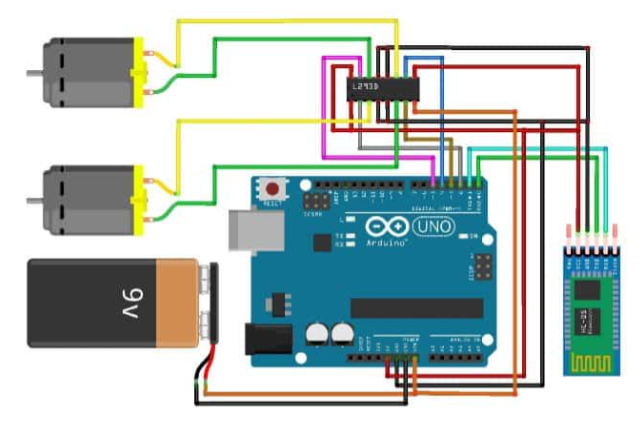
| This project involves building a Bluetooth-voice-controlled car for competitive robotic racing. Using Arduino or a similar microcontroller, along with motors and sensors, the car can be maneuvered remotely via a smartphone or tablet app. The objective is to design a responsive and agile vehicle capable of navigating challenging racecourses, showcasing both engineering and programming skills in a competitive racing environment. Components Required: 1. Arduino Board (e.g., Arduino Uno) 2. Motor Driver Module (e.g., L298N) 3. DC Motors (2x for driving) 4. Bluetooth Module (e.g., HC-05 or HC-06) 5. Chassis with Wheels 6. Power Source (Battery Pack) 7. Jumper Wires Connections: 1. Motor Driver Module to Arduino: o Connect IN1, IN2, IN3, and IN4 of the motor driver to digital output pins on Arduino (e.g., 9,6,5,4). o Connect the ENA and ENB pins of the motor driver to PWM-capable pins on Arduino (e.g., 10,3) for speed control. o Connect the OUT1, OUT2, OUT3, and OUT4 of the motor driver to the terminals of the DC motors. 2. Bluetooth Module to Arduino: o Connect VCC and GND of the Bluetooth module to 5V and GND on Arduino, respectively. o Connect the TX pin of the Bluetooth module to the RX pin (pin 0) of Arduino through a voltage divider (optional for 5V Arduino, HC-05 can accept 3.3V logic). o Connect the RX pin of the Bluetooth module to the TX pin (pin 1) of Arduino. 3. Power Connections: o Power the Arduino board through its DC jack or VIN pin using the battery pack (make sure to match voltage ratings). o Connect the power terminals of the motor driver to the battery pack, ensuring it can supply enough current for the motors. 4. Chassis and Motors: o Mount the motors on the chassis and connect them to the motor driver as per the connections mentioned above. |
String readvoice;
int k=0;
void setup() {
Serial.begin(9600);
pinMode(2,OUTPUT);
pinMode(3,OUTPUT);
pinMode(4,OUTPUT);
pinMode(5,OUTPUT);
}

void loop() {
while (Serial.available())
{
delay(3);
char c = Serial.read();
readvoice += c;
}

if(readvoice.length() > 0)
{
Serial.println(readvoice);

if(readvoice == "forward")
{
digitalWrite(2, HIGH);
digitalWrite(3, LOW);
digitalWrite(4, HIGH);
digitalWrite(5, LOW);
k=1;
}

if(readvoice == "backward")
{
digitalWrite(2, LOW);
digitalWrite(3, HIGH);
digitalWrite(4, LOW);
digitalWrite(5, HIGH);
k=2;
}

if(readvoice == "left")
{
if (k==2)
{
digitalWrite(2, HIGH);
digitalWrite(3, LOW);
digitalWrite(4, LOW);
digitalWrite(5, LOW);
delay(1000);
digitalWrite(2, LOW);
digitalWrite(3, HIGH);
digitalWrite(4, LOW);
digitalWrite(5, HIGH);
}
else
{
digitalWrite(2, HIGH);
digitalWrite(3, LOW);
digitalWrite(4, LOW);
digitalWrite(5, LOW);
delay(1000);
digitalWrite(2, HIGH);
digitalWrite(3, LOW);
digitalWrite(4, HIGH);
digitalWrite(5, LOW);
}
}

if(readvoice == "right")
{
if (k==2)
{
digitalWrite(2, LOW);
digitalWrite(3, LOW);
digitalWrite(4, HIGH);
digitalWrite(5, LOW);
delay(1000);
digitalWrite(2, LOW);
digitalWrite(3, HIGH);
digitalWrite(4, LOW);
digitalWrite(5, HIGH);
}
else
{
digitalWrite(2, LOW);
digitalWrite(3, LOW);
digitalWrite(4, HIGH);
digitalWrite(5, LOW);
delay(1000);
digitalWrite(2, HIGH);
digitalWrite(3, LOW);
digitalWrite(4, HIGH);
digitalWrite(5, LOW);
}
}

if(readvoice == "stop")
{
digitalWrite(2, LOW);
digitalWrite(3, LOW);
digitalWrite(4, LOW);
digitalWrite(5, LOW);
}
}
readvoice="";
}