Project Description:
The Unmanned Land Vehicle (ULV) is a robotic system that is designed to navigate and interact with its environment autonomously using sensors and operate without a man onboard. It is equipped with obstacle detection and laser firing capabilities, this project shows the interfacing of ultrasonic sensors, a laser module, and motor control to create a functional prototype suitable for various applications, including military use, bomb diffusion, and other hazardous tasks where human life is at risk.
Components Required:
- Arduino uno with cable x 1
- Motor driver L298N x 1
- DC motor x 2
- Laser module 650nm 5v x 1
- Jumper wires – Male to Male x 2
– Male to Female x 20 - Breadboard small x 1
- Lithium-ion battery 3.7v 18650 x 3
- Lithium-ion battery Holder x 1
Applications
- Military Use as Tanks
- Bomb Diffusion
- Search and Rescue Missions
- Exploration in Hazardous Environments
Benefits
- Enhanced Safety
- Cost-Effective
Conclusion
The Unmanned Land Vehicle with obstacle detection and laser firing capabilities is a robust and flexible solution for dangerous tasks and hazardous places. Its applications in military and civilian scenarios highlight its potential to save lives and enhance operational efficiency in challenging environments. The project demonstrates the integration of simple yet effective technologies to create a powerful tool for modern challenges.
IMAGE:

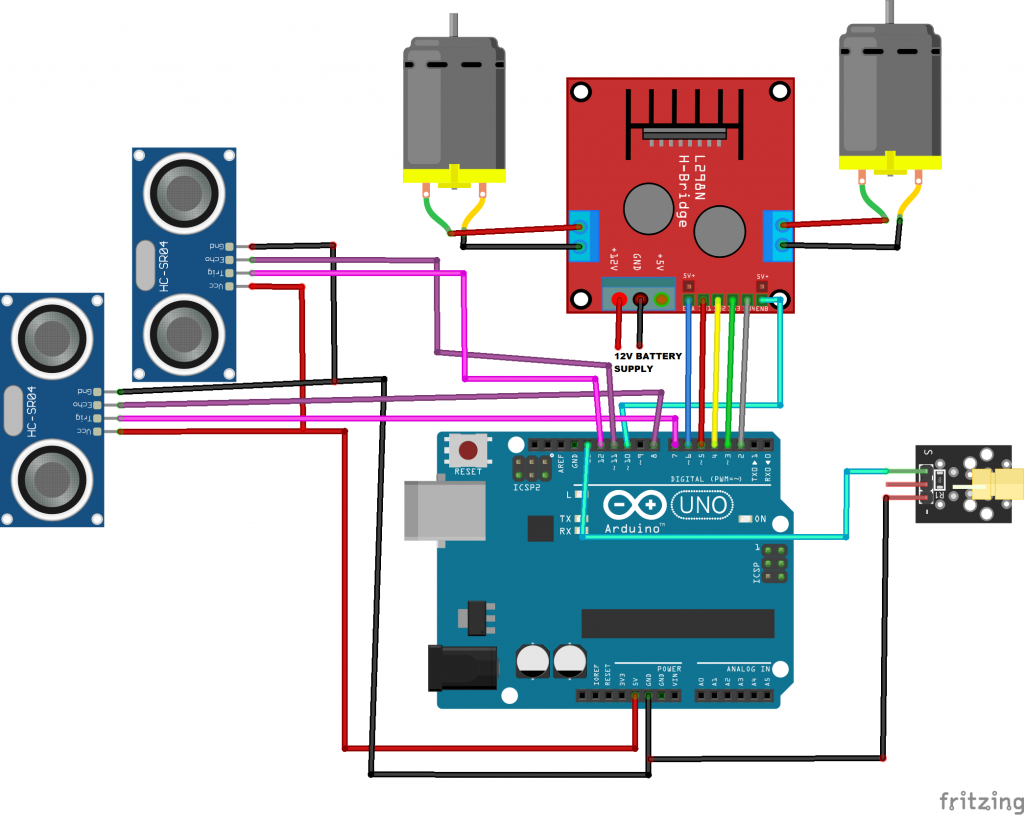
CIRCUIT CONNECTIONS:
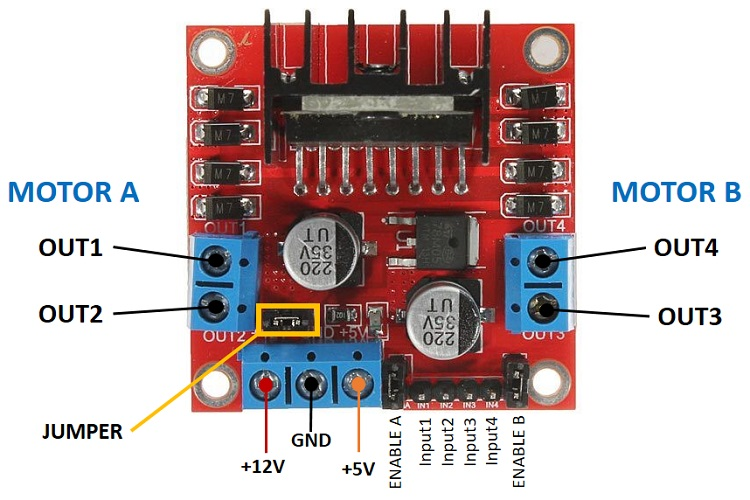
MOTOR DRIVER PIN NAMES:
Connections:
Connection of Arduino with Motor driver L298N:
- Arduino pin 6 to motor driver pin ENA
- Arduino pin 5 to motor driver pin IN1
- Arduino pin 4 to motor driver pin IN2
- Arduino pin 3 to motor driver pin IN3
- Arduino pin 2 to motor driver pin IN4
- Arduino pin 10 to motor driver pin ENB
Connection of Arduino with Ultrasonic sensor:
- Arduino pin 5v to VCC of both ultrasonic sensors using a breadboard
- Arduino pin GND to GND of both ultrasonic sensors using a breadboard
- Arduino pin 7 to trig pin of first ultrasonic sensor
- Arduino pin 8 to echo pin of first ultrasonic sensor
- Arduino pin 12 to trig of second ultrasonic sensor
- Arduino pin 11 to echo of second ultrasonic sensor
Connection of Arduino with Laser module:
- Arduino GND pin to Negative of Laser module
- Arduino pin 13 to signal of Laser module
NOTE: Before uploading and running the code IN ARDUINO IDE:
Go to > Sketch > Include Library > Manage Libraries… > Type the library name
OR Go to > Sketch > Include Library > Add .ZIP Library… download the zip library from the link given below.
newping – https://github.com/eliteio/Arduino_New_Ping
CODE:
#include <NewPing.h>

// Define motor pins
#define IN1 5
#define IN2 4
#define IN3 3
#define IN4 2

// Define ultrasonic sensor pins and range
#define TRIG_PIN1 12
#define ECHO_PIN1 11
#define TRIG_PIN2 8
#define ECHO_PIN2 7
#define MAX_DISTANCE 200

// Define laser pin
#define LASER_PIN 13

// Initialize NewPing objects
NewPing sonar1(TRIG_PIN1, ECHO_PIN1, MAX_DISTANCE);
NewPing sonar2(TRIG_PIN2, ECHO_PIN2, MAX_DISTANCE);

void setup() {
  // Initialize serial communication
  Serial.begin(9600);

  // Initialize motor pins
  pinMode(IN1, OUTPUT);
  pinMode(IN2, OUTPUT);
  pinMode(IN3, OUTPUT);
  pinMode(IN4, OUTPUT);

  // Initialize laser pin
  pinMode(LASER_PIN, OUTPUT);

  // Set initial state for motors (stop)
  digitalWrite(IN1, LOW);
  digitalWrite(IN2, LOW);
  digitalWrite(IN3, LOW);
  digitalWrite(IN4, LOW);

  // Set initial state for laser (off)
  digitalWrite(LASER_PIN, LOW);
}

void loop() {
  // Measure distances
  unsigned int distance1 = sonar1.ping_cm();
  unsigned int distance2 = sonar2.ping_cm();

  Serial.print("Distance1: ");
  Serial.print(distance1);
  Serial.print(" cm, Distance2: ");
  Serial.print(distance2);

  // Check if any sensor detects an obstacle within 20 cm
  if (distance1 < 20 || distance2 < 20) {
    stopVehicle();
    fireLaser();
  } else {
    moveForward();
  }

  delay(100);
}

void moveForward() {
  digitalWrite(IN1, HIGH);
  digitalWrite(IN2, LOW);
  digitalWrite(IN3, HIGH);
  digitalWrite(IN4, LOW);
}

void stopVehicle() {
  digitalWrite(IN1, LOW);
  digitalWrite(IN2, LOW);
  digitalWrite(IN3, LOW);
  digitalWrite(IN4, LOW);
}

void fireLaser() {
  digitalWrite(LASER_PIN, HIGH);
  delay(500);  // Laser on for 0.5 seconds
  digitalWrite(LASER_PIN, LOW);
}


