The Thermobott prototype is designed to control and maintain the temperature of water inside a bottle using advanced electronic components:
1. DHT11 Sensor: This sensor monitors the temperature and humidity inside the bottle, providing real-time data to the control system.
2. Peltier Module: A thermoelectric device that can cool or heat the water inside the bottle based on the temperature readings from the DHT11 sensor.
3. Fan: Helps in dissipating heat generated by the Peltier module, ensuring efficient cooling or heating operations.
4. LCD Display: Provides visual feedback by displaying the current temperature of the water, set temperature, and operational status.
Functionality:
· Temperature Control: The Peltier module adjusts its operation based on the temperature readings from the DHT11 sensor. If the water temperature deviates from the desired set point, the module either heats or cools the water to maintain the preset temperature.
· User Interaction: Users can set their desired water temperature using controls interfaced with the Arduino. The LCD display shows the current temperature and allows for adjustments as needed.
· Efficient Cooling and Heating: The fan ensures that the Peltier module operates optimally by dissipating excess heat, thereby enhancing the efficiency of temperature control.
Applications:
The Thermobott prototype finds applications in various scenarios:
· Travel and Outdoor Activities: Keeps water at a comfortable temperature during hiking, camping, or road trips.
· Home Use: Provides convenient access to both hot and cold water without the need for separate bottles.
· Healthcare Settings: Ensures medications requiring specific storage temperatures are kept within recommended ranges.
Conclusion:
The Thermobott prototype demonstrates the integration of advanced temperature control technology into a portable water bottle. By combining the DHT11 sensor, Peltier module, fan, and LCD display, it offers users a convenient way to maintain their preferred water temperature, making it suitable for both everyday use and specialized applications.
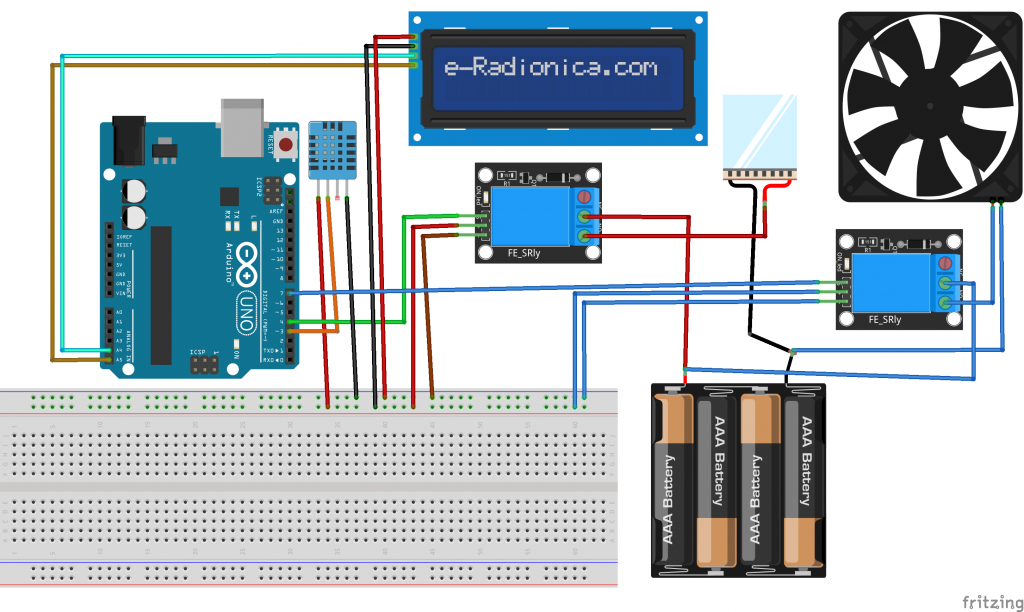
CIRCUIT DIAGRAM
CODE
#include<DHT.h>
#define DHTTYPE DHT11
#define dht_pin 7
DHT dht(dht_pin,DHTTYPE);
int relayP=6;
int relayF=5;
#include <Wire.h>
#include <LiquidCrystal_I2C.h>
LiquidCrystal_I2C lcd(0x27,16,2);  // set the LCD address to 0x27 for a 16 chars and 2 line display
void setup() {
  Serial.begin(9600);
    dht.begin();
  lcd.init();                      // initialize the lcd
  lcd.init();
  // Print a message to the LCD.
  lcd.backlight();
  pinMode(relayP,OUTPUT);
   pinMode(relayF,OUTPUT);
}
void loop() {
 float T =dht.readTemperature();
 float H =dht.readHumidity();
  if (isnan(T) || isnan(H))
    {
        Serial.println("Failed to read from DHT");
    }
    else {
      Serial.print("Temperature = ");
  Serial.print(T);
  lcd.setCursor(0,0);
    lcd.print("T=");
    lcd.setCursor(3,0);
   lcd.print(T);
  Serial.print("C");
  Serial.print(" ");
  Serial.print("Humidity =");
  Serial.print(H);
  Serial.print("%");
  lcd.setCursor(9,0);
    lcd.print("H=");
    lcd.setCursor(11,0);
   lcd.print(H);
  Serial.println("");
  delay(500);
  if(T>=22)
  {
  digitalWrite(relayF,HIGH);
  }
  else
   {
  digitalWrite(relayF,LOW);
  }
   if(T<22)
  {
  digitalWrite(relayP,HIGH);
  }
  else
   {
  digitalWrite(relayP,LOW);
  }
    }
}


