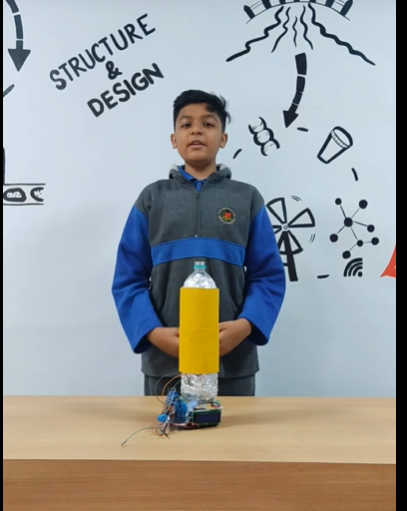
The Solar Tracker project is designed to optimize the efficiency of solar panels by keeping them aligned with the sun’s position throughout the day. This project utilizes an Arduino microcontroller, Light Dependent Resistors (LDRs), and two servo motors to dynamically adjust the orientation of solar panels for maximum sunlight exposure.
Components List:
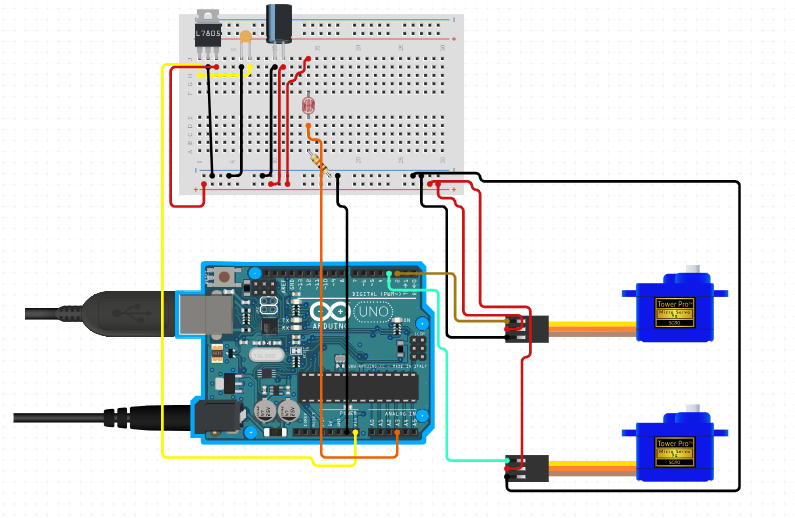
- Arduino Uno: The microcontroller that processes data from the sensors and controls the servo motors.
- LDRs (Light Dependent Resistors): Sensors that detect the intensity of sunlight, used to determine the sun’s position.
- Servo Motors (2): Actuators that adjust the position of the solar panel along two axes (horizontal and vertical).
- Solar Panel: The photovoltaic panel being tracked to maximize sunlight exposure.
- Breadboard and Connecting Wires: For prototyping and connecting components.
- Power Supply: Typically 5V for the Arduino and servos.
- Mounting Hardware: To securely attach the solar panel and allow for its movement.
Description:
The Solar Tracker system functions by using LDRs placed on the solar panel to measure the intensity of sunlight from different directions. The Arduino processes these readings and determines the direction where the sunlight is strongest. It then adjusts the position of the solar panel using the two servo motors: one controls the horizontal axis, and the other controls the vertical axis. This dual-axis movement ensures that the solar panel remains perpendicular to the sun’s rays throughout the day, maximizing energy absorption.
Uses and Applications:
- Residential Solar Systems: Enhances the efficiency of home solar power systems by increasing the energy captured throughout the day.
- Commercial Solar Farms: Utilized in large-scale solar farms to significantly boost overall energy production.
- Educational Demonstrations: A practical project for teaching students about renewable energy, electronics, and automation.
- Off-Grid Applications: Ideal for off-grid solar installations where maximizing energy capture is crucial for maintaining power supply.
By continuously adjusting the position of the solar panels to follow the sun, the Solar Tracker project can increase the energy output by up to 30-40% compared to stationary panels. This makes it a valuable tool for improving the efficiency of solar power systems, contributing to more sustainable and cost-effective energy solutions.
// Include Libraries

#include "Arduino.h"

#include "LDR.h"

#include "Servo.h"
// Pin Definitions

#define LDR_PIN_SIG	A3

#define SERVO9G1_1_PIN_SIG	2

#define SERVO9G2_2_PIN_SIG	3

// Global variables and defines

#define THRESHOLD_ldr   100

int ldrAverageLight;

const int servo9g1_1RestPosition   = 20;  //Starting position

const int servo9g1_1TargetPosition = 150; //Position when event is detected

const int servo9g2_2RestPosition   = 20;  //Starting position

const int servo9g2_2TargetPosition = 150; //Position when event is detected

// object initialization

LDR ldr(LDR_PIN_SIG);

Servo servo9g1_1;

Servo servo9g2_2;

// define vars for testing menu

const int timeout = 10000;       //define timeout of 10 sec

char menuOption = 0;

long time0;

// Setup the essentials for your circuit to work. It runs first every time your circuit is powered with electricity.

void setup()

{

    // Setup Serial which is useful for debugging

    // Use the Serial Monitor to view printed messages

    Serial.begin(9600);

    while (!Serial) ; // wait for serial port to connect. Needed for native USB

    Serial.println("start");


    ldrAverageLight = ldr.readAverage();

    servo9g1_1.attach(SERVO9G1_1_PIN_SIG);

    servo9g1_1.write(servo9g1_1RestPosition);

    delay(100);

    servo9g1_1.detach();

    servo9g2_2.attach(SERVO9G2_2_PIN_SIG);

    servo9g2_2.write(servo9g2_2RestPosition);

    delay(100);

    servo9g2_2.detach();

    menuOption = menu();


}


// Main logic of your circuit. It defines the interaction between the components you selected. After setup, it runs over and over again, in an eternal loop.

void loop()

{


    if(menuOption == '1') {

    // LDR (Mini Photocell) - Test Code

    // Get current light reading, substract the ambient value to detect light changes

    int ldrSample = ldr.read();

    int ldrDiff = abs(ldrAverageLight - ldrSample);

    Serial.print(F("Light Diff: ")); Serial.println(ldrDiff);


    }

    else if(menuOption == '2') {

    // 9G Micro Servo #1 - Test Code

    // The servo will rotate to target position and back to resting position with an interval of 500 milliseconds (0.5 seconds)

    servo9g1_1.attach(SERVO9G1_1_PIN_SIG);         // 1. attach the servo to correct pin to control it.

    servo9g1_1.write(servo9g1_1TargetPosition);  // 2. turns servo to target position. Modify target position by modifying the 'ServoTargetPosition' definition above.

    delay(500);                              // 3. waits 500 milliseconds (0.5 sec). change the value in the brackets (500) for a longer or shorter delay in milliseconds.

    servo9g1_1.write(servo9g1_1RestPosition);    // 4. turns servo back to rest position. Modify initial position by modifying the 'ServoRestPosition' definition above.

    delay(500);                              // 5. waits 500 milliseconds (0.5 sec). change the value in the brackets (500) for a longer or shorter delay in milliseconds.

    servo9g1_1.detach();                    // 6. release the servo to conserve power. When detached the servo will NOT hold it's position under stress.

    }

    else if(menuOption == '3') {

    // 9G Micro Servo #2 - Test Code

    // The servo will rotate to target position and back to resting position with an interval of 500 milliseconds (0.5 seconds)

    servo9g2_2.attach(SERVO9G2_2_PIN_SIG);         // 1. attach the servo to correct pin to control it.

    servo9g2_2.write(servo9g2_2TargetPosition);  // 2. turns servo to target position. Modify target position by modifying the 'ServoTargetPosition' definition above.

    delay(500);                              // 3. waits 500 milliseconds (0.5 sec). change the value in the brackets (500) for a longer or shorter delay in milliseconds.

    servo9g2_2.write(servo9g2_2RestPosition);    // 4. turns servo back to rest position. Modify initial position by modifying the 'ServoRestPosition' definition above.

    delay(500);                              // 5. waits 500 milliseconds (0.5 sec). change the value in the brackets (500) for a longer or shorter delay in milliseconds.

    servo9g2_2.detach();                    // 6. release the servo to conserve power. When detached the servo will NOT hold it's position under stress.

    }


    if (millis() - time0 > timeout)

    {

        menuOption = menu();

    }


}


// Menu function for selecting the components to be tested

// Follow serial monitor for instrcutions

char menu()

{


    Serial.println(F("\nWhich component would you like to test?"));

    Serial.println(F("(1) LDR (Mini Photocell)"));

    Serial.println(F("(2) 9G Micro Servo #1"));

    Serial.println(F("(3) 9G Micro Servo #2"));

    Serial.println(F("(menu) send anything else or press on board reset button\n"));

    while (!Serial.available());


    // Read data from serial monitor if received

    while (Serial.available())

    {

        char c = Serial.read();

        if (isAlphaNumeric(c))

        {


            if(c == '1')

    			Serial.println(F("Now Testing LDR (Mini Photocell)"));

    		else if(c == '2')

    			Serial.println(F("Now Testing 9G Micro Servo #1"));

    		else if(c == '3')

    			Serial.println(F("Now Testing 9G Micro Servo #2"));

            else

            {

                Serial.println(F("illegal input!"));

                return 0;

            }

            time0 = millis();

            return c;

        }

    }

} 
