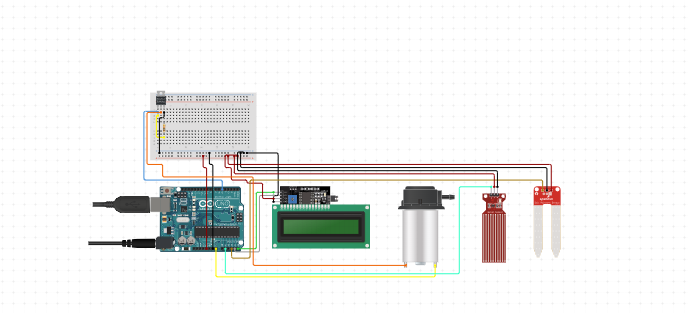
Components Required
1. Arduino Board (e.g., Arduino Uno) – 1
2. 8×8 LED Matrix Display – 1
3. Soil Moisture Sensor – 1
4. MOSFET (e.g., IRF540N) – 1
5. Water Pump Motor – 1
6. Breadboard – 1
7. Resistors (e.g., 10kΩ for the gate of the MOSFET) – 1
8. Diode (e.g., 1N4007 for flyback protection) – 1
9. Power Supply for the Water Pump -12V
10. Connecting Wires
Connections
11. Soil Moisture Sensor
· VCC: Connect to Arduino 5V
· GND: Connect to Arduino GND
· Analog Output (A3): Connect to Arduino analog input pin A3
12. 8×8 LED Matrix Display
· Connect the LED matrix to the pin number 10,11,12 of the Arduino
13. MOSFET
· Drain (D): Connect to the negative terminal of the water pump motor
· Source (S): Connect to Arduino GND and the negative terminal of the power supply for the water pump
· Gate (G): Connect to the resistor (10kΩ) and another end of the resistor is connected to the source.
14. Water Pump Motor
· Positive Terminal: Connect to the positive terminal of the power supply for the water pump
· Negative Terminal: Connect to the drain of the MOSFET
#include <Wire.h>
#include <LiquidCrystal_I2C.h>
// Initialize the LCD display with the I2C address 0x27
LiquidCrystal_I2C lcd(0x27, 16, 2);
const int waterLevelPin = A1; // Water level sensor connected to A0
const int soilMoisturePin = A3; // Soil moisture sensor connected to A1
const int pumpPin = 5; // Relay module for the motor pump connected to digital pin 7
int waterLevel = 0;
int soilMoisture = 0;
int soilMoistureThreshold = 400; // Adjust this value based on your soil moisture sensor calibration
void setup() {
// Initialize the LCD
lcd.begin();
lcd.backlight();
// Set pumpPin as output
pinMode(pumpPin, OUTPUT);
digitalWrite(pumpPin, LOW);
// Print a message to the LCD
lcd.setCursor(0, 0);
lcd.print(“Water System”);
delay(2000);
lcd.clear();
}
void loop() {
// Read the water level sensor
waterLevel = analogRead(waterLevelPin);
// Read the soil moisture sensor
soilMoisture = analogRead(soilMoisturePin);
// Display the water level and soil moisture on the LCD
lcd.setCursor(0, 0);
lcd.print(“Water: “);
lcd.print(waterLevel);
lcd.setCursor(0, 1);
lcd.print(“Soil: “);
lcd.print(soilMoisture);
// Check if soil moisture is below the threshold
if (soilMoisture < soilMoistureThreshold) {
// Turn on the pump
digitalWrite(pumpPin, HIGH);
lcd.setCursor(10, 1);
lcd.print(“Pump ON “);
} else {
// Turn off the pump
digitalWrite(pumpPin, LOW);
lcd.setCursor(10, 1);
lcd.print(“Pump OFF”);
}
// Add a short delay before the next loop
delay(2000);
}


