This System will be Inside the Street Light Pole on Road and Highways. This system can also be used at Home for safety purposes. The aim of this project is to create a clean, safe, and smart city. In this project, there will be a keypad inside and a controller through which the data will be sent to a nearby station according to the services according to the button pressed in the system. (The Services are following.) for tsafety,ty- it will Send the Data to Nearby Woman Organization and Police. For any theft or accident, it will send the data to nearby police and ambulances. For the toilet, an automatic toilet will come to the location. For fire safety, it will send the data to a nearby fire station. If there is a road accident due to fog in the future, the details will be sent to everyone’s mobile.
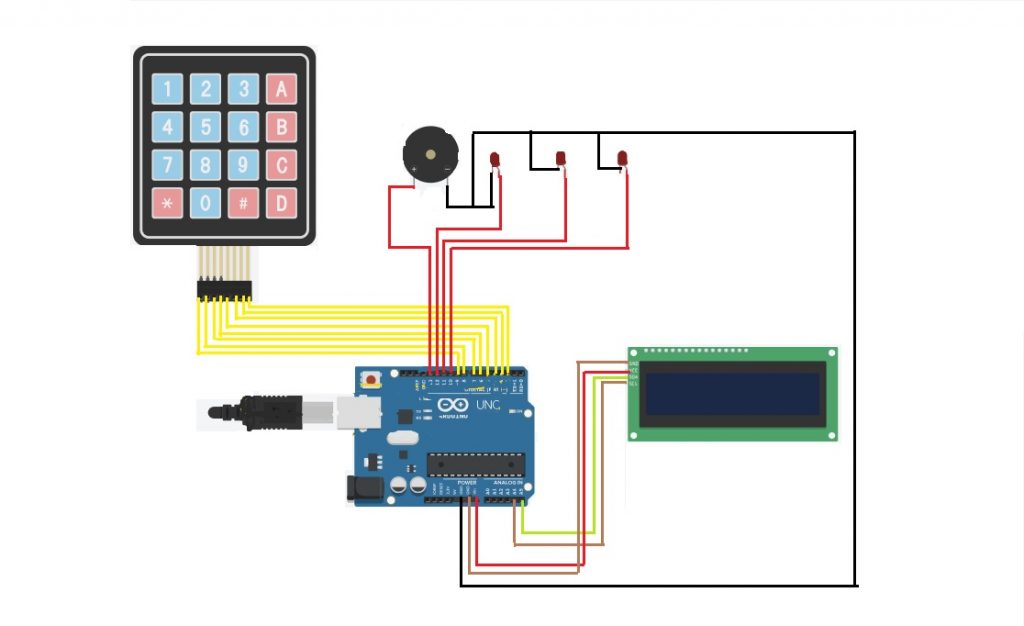
Components Required:
- Arduino Uno
- 4*4 Keypad
- I2C LCD
- LED
- BUZZER
- WIRE [Male to Male X]
Code Source:
#include <Wire.h>
#include <LiquidCrystal_I2C.h>
#include <Keypad.h>
// I2C LCD setup
LiquidCrystal_I2C lcd(0x27, 16, 2); // Adjust the address (0x27) if necessary
// Keypad setup
const byte ROWS = 4; // Four rows
const byte COLS = 4; // Four columns
char keys[ROWS][COLS] = {
{‘1’, ‘2’, ‘3’, ‘A’},
{‘4’, ‘5’, ‘6’, ‘B’},
{‘7’, ‘8’, ‘9’, ‘C’},
{‘*’, ‘0’, ‘#’, ‘D’}
};
byte rowPins[ROWS] = {9, 8, 7, 6}; // Connect to the row pinouts of the keypad
byte colPins[COLS] = {5, 4, 3, 2}; // Connect to the column pinouts of the keypad
Keypad keypad = Keypad(makeKeymap(keys), rowPins, colPins, ROWS, COLS);
// LED and Buzzer pins
const int policeLED = 10;
const int hospitalLED = 11;
const int fireLED = 12;
const int buzzer = 13;
void setup() {
// Initialize LCD
lcd.begin();
lcd.backlight();
lcd.setCursor(0, 0);
lcd.print(“Smart Alert Sys”);
// Set LED and buzzer pins as output
pinMode(policeLED, OUTPUT);
pinMode(hospitalLED, OUTPUT);
pinMode(fireLED, OUTPUT);
pinMode(buzzer, OUTPUT);
// Turn off LEDs and buzzer initially
digitalWrite(policeLED, LOW);
digitalWrite(hospitalLED, LOW);
digitalWrite(fireLED, LOW);
digitalWrite(buzzer, LOW);
Serial.begin(9600); // Initialize serial communication
}
void loop() {
char key = keypad.getKey();
if (key) {
Serial.println(key);
lcd.clear();
lcd.setCursor(0, 0);
switch (key) {
case ‘A’:
sendAlert(“Police Alert”, policeLED);
break;
case ‘B’:
sendAlert(“Hospital Alert”, hospitalLED);
break;
case ‘C’:
sendAlert(“Fire Alert”, fireLED);
break;
default:
lcd.print(“Invalid Option”);
break;
}
}
}
void sendAlert(String message, int ledPin) {
lcd.print(message);
digitalWrite(ledPin, HIGH); // Turn on the respective LED
digitalWrite(buzzer, HIGH); // Turn on the buzzer
delay(1000); // Keep LED and buzzer on for 1 second
digitalWrite(ledPin, LOW); // Turn off the LED
digitalWrite(buzzer, LOW); // Turn off the buzzer
// Simulate sending an alert (e.g., via serial, GSM module, etc.)
Serial.println(message);
delay(2000); // Wait for 2 seconds before allowing another alert
}