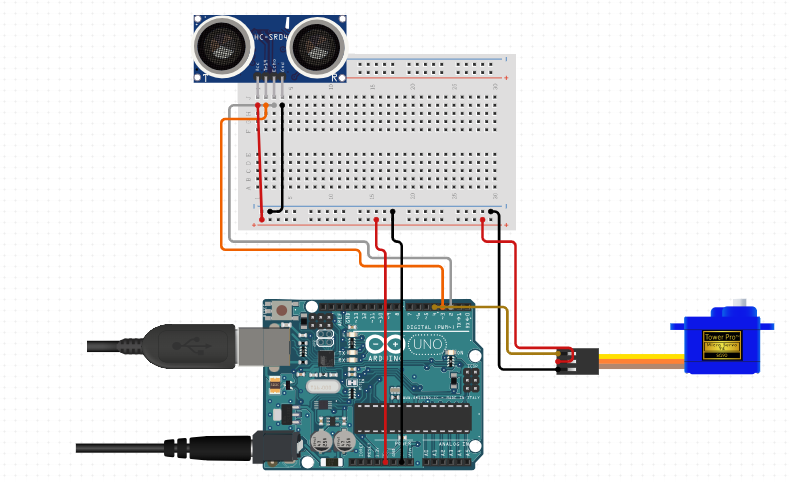
| The Smart Rotator project combines ultrasonic sensing technology with precise servo motor control to create a versatile and intelligent device capable of automating rotational tasks. This project typically involves integrating an ultrasonic sensor, microcontroller, servo motor, and associated circuitry to achieve its functionalities. Components List : Ultrasonic Sensor: Used for distance measurement, typically an HC-SR04 or similar. Microcontroller: Often an Arduino or Raspberry Pi for processing sensor data and controlling the servo motor. Servo Motor: Provides precise rotational control based on commands received from the microcontroller. Motor Driver: If needed, to interface between the microcontroller and servo motor. Power Supply: Typically 5V for the microcontroller and servo motor, and possibly a separate power source for the servo if required. Mounting Hardware: To secure the components and create a stable structure for rotation. Connecting Wires and Breadboard: For connecting the components and prototyping. Applications: The Smart Rotator project finds application in various fields where automated rotational control is beneficial: Photography: Automating camera positioning for time-lapse photography or panoramic shots. Robotics: Adjusting sensors or actuators based on environmental conditions. Industrial Automation: Positioning sensors or tools in assembly lines or quality control processes. Home Automation: Rotating objects or displays based on user commands or environmental changes. Education: Teaching basic principles of sensors, actuators, and microcontroller programming. Description: The system works by using the ultrasonic sensor to measure distances in its surroundings. The microcontroller processes these distance measurements and computes commands for the servo motor, adjusting its angle or rotation speed accordingly. This setup enables the Smart Rotator to autonomously position objects or devices based on preset parameters or real-time environmental conditions. The project’s versatility and precision make it suitable for both hobbyist and practical applications, offering a customizable solution for automating rotational tasks in various settings. By leveraging the capabilities of ultrasonic sensing and servo motor control, the Smart Rotator enhances efficiency and accuracy in tasks requiring controlled rotation or positioning, contributing to advancements in automation and user convenience across different fields. |
// Include Libraries

#include "Arduino.h"

#include "NewPing.h"

#include "Servo.h"


// Pin Definitions

#define HCSR04_PIN_TRIG	3

#define HCSR04_PIN_ECHO	2

#define SERVO9G_PIN_SIG	4


// Global variables and defines

const int servo9gRestPosition   = 20;  //Starting position

const int servo9gTargetPosition = 150; //Position when event is detected

// object initialization

NewPing hcsr04(HCSR04_PIN_TRIG,HCSR04_PIN_ECHO);

Servo servo9g;


// define vars for testing menu

const int timeout = 10000;       //define timeout of 10 sec

char menuOption = 0;

long time0;


// Setup the essentials for your circuit to work. It runs first every time your circuit is powered with electricity.

void setup()

{

    // Setup Serial which is useful for debugging

    // Use the Serial Monitor to view printed messages

    Serial.begin(9600);

    while (!Serial) ; // wait for serial port to connect. Needed for native USB

    Serial.println("start");


    servo9g.attach(SERVO9G_PIN_SIG);

    servo9g.write(servo9gRestPosition);

    delay(100);

    servo9g.detach();

    menuOption = menu();


}


// Main logic of your circuit. It defines the interaction between the components you selected. After setup, it runs over and over again, in an eternal loop.

void loop()

{


    if(menuOption == '1') {

    // Ultrasonic Sensor - HC-SR04 - Test Code

    // Read distance measurment from UltraSonic sensor

    int hcsr04Dist = hcsr04.ping_cm();

    delay(10);

    Serial.print(F("Distance: ")); Serial.print(hcsr04Dist); Serial.println(F("[cm]"));


    }

    else if(menuOption == '2') {

    // 9G Micro Servo - Test Code

    // The servo will rotate to target position and back to resting position with an interval of 500 milliseconds (0.5 seconds)

    servo9g.attach(SERVO9G_PIN_SIG);         // 1. attach the servo to correct pin to control it.

    servo9g.write(servo9gTargetPosition);  // 2. turns servo to target position. Modify target position by modifying the 'ServoTargetPosition' definition above.

    delay(500);                              // 3. waits 500 milliseconds (0.5 sec). change the value in the brackets (500) for a longer or shorter delay in milliseconds.

    servo9g.write(servo9gRestPosition);    // 4. turns servo back to rest position. Modify initial position by modifying the 'ServoRestPosition' definition above.

    delay(500);                              // 5. waits 500 milliseconds (0.5 sec). change the value in the brackets (500) for a longer or shorter delay in milliseconds.

    servo9g.detach();                    // 6. release the servo to conserve power. When detached the servo will NOT hold it's position under stress.

    }


    if (millis() - time0 > timeout)

    {

        menuOption = menu();

    }


}


// Menu function for selecting the components to be tested

// Follow serial monitor for instrcutions

char menu()

{


    Serial.println(F("\nWhich component would you like to test?"));

    Serial.println(F("(1) Ultrasonic Sensor - HC-SR04"));

    Serial.println(F("(2) 9G Micro Servo"));

    Serial.println(F("(menu) send anything else or press on board reset button\n"));

    while (!Serial.available());


    // Read data from serial monitor if received

    while (Serial.available())

    {

        char c = Serial.read();

        if (isAlphaNumeric(c))

        {


            if(c == '1')

    			Serial.println(F("Now Testing Ultrasonic Sensor - HC-SR04"));

    		else if(c == '2')

    			Serial.println(F("Now Testing 9G Micro Servo"));

            else

            {

                Serial.println(F("illegal input!"));

                return 0;

            }

            time0 = millis();

            return c;

        }

    }

} 


