The Smart Lock System project utilizes an Arduino Uno microcontroller and a keypad to create a secure and programmable locking mechanism. This project is designed to offer both convenience and security by allowing users to enter a predefined code on the keypad to unlock a door or access a secure area.
Components List:
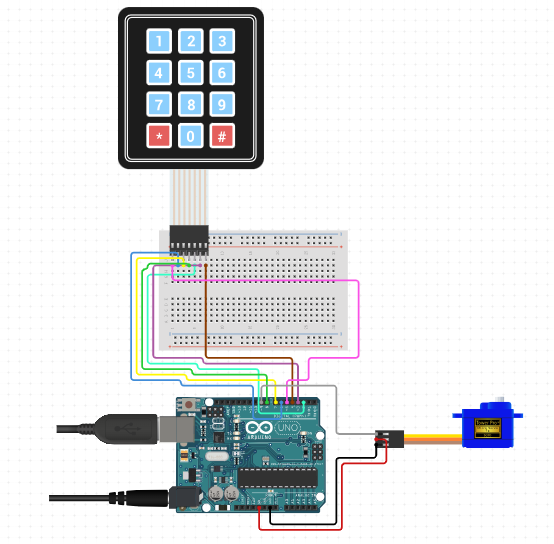
- Arduino Uno: Acts as the central processing unit, controlling the operation of the smart lock system.
- Keypad: Typically a 4×4 or 3×4 matrix keypad, used for entering the access code.
- Servo Motor: To physically lock and unlock the door or mechanism.
- LCD Display (Optional): Provides visual feedback such as system status or messages.
- Breadboard and Connecting Wires: For prototyping and connecting the components.
- Jumper wires: Male 2 Male x 11.
- Power Supply: Typically 5V DC for the Arduino Uno and servo motor.
Examples of Use:
The Smart Lock System can be implemented in various scenarios:
- Home Security: Securing doors with a keypad-operated lock.
- Office Access Control: Restricting access to authorized personnel only.
- Locker Systems: Providing secure storage with personalized access codes.
- Rental Properties: Allowing temporary access to tenants or guests.
- Education Facilities: Controlling access to classrooms or sensitive areas.
Description:
In operation, the Arduino Uno reads input from the keypad, allowing users to input a predefined code. The microcontroller compares this code to stored data and activates the servo motor to unlock the door if the correct code is entered. The LCD display can show prompts or system status, enhancing user interaction.
This smart lock system enhances security by replacing traditional locks with a digital solution that can be easily reprogrammed as needed. It offers flexibility in access management and can integrate additional features like remote control via Bluetooth or Wi-Fi modules for advanced functionality. The project combines hardware integration with software programming, making it a practical and educational endeavor for learning about microcontroller-based systems and electronic security solutions.
// Include Libraries

#include "Arduino.h"

#include "Keypad.h"

#include "Servo.h"

// Pin Definitions

#define KEYPADMEM3X4_PIN_ROW1	5

#define KEYPADMEM3X4_PIN_ROW2	6

#define KEYPADMEM3X4_PIN_ROW3	7

#define KEYPADMEM3X4_PIN_ROW4	8

#define KEYPADMEM3X4_PIN_COL1	2

#define KEYPADMEM3X4_PIN_COL2	3

#define KEYPADMEM3X4_PIN_COL3	4

#define SERVO9G_PIN_SIG	9


// Global variables and defines

//Use this 2D array to map the keys as you desire

char keypadmem3x4keys[ROWS][COLS] = {

{'1','2','3'},

{'4','5','6'},

{'7','8','9'},

{'*','0','#'}

};

const int servo9gRestPosition   = 20;  //Starting position

const int servo9gTargetPosition = 150; //Position when event is detected

// object initialization

Keypad keypadmem3x4(KEYPADMEM3X4_PIN_COL1,KEYPADMEM3X4_PIN_COL2,KEYPADMEM3X4_PIN_COL3,KEYPADMEM3X4_PIN_ROW1,KEYPADMEM3X4_PIN_ROW2,KEYPADMEM3X4_PIN_ROW3,KEYPADMEM3X4_PIN_ROW4);

Servo servo9g;
// define vars for testing menu

const int timeout = 10000;       //define timeout of 10 sec

char menuOption = 0;

long time0;


// Setup the essentials for your circuit to work. It runs first every time your circuit is powered with electricity.

void setup()

{

    // Setup Serial which is useful for debugging

    // Use the Serial Monitor to view printed messages

    Serial.begin(9600);

    while (!Serial) ; // wait for serial port to connect. Needed for native USB

    Serial.println("start");


    //Initialize the keypad with selected key map

    keypadmem3x4.begin(keypadmem3x4keys);

    servo9g.attach(SERVO9G_PIN_SIG);

    servo9g.write(servo9gRestPosition);

    delay(100);

    servo9g.detach();

    menuOption = menu();

}
// Main logic of your circuit. It defines the interaction between the components you selected. After setup, it runs over and over again, in an eternal loop.

void loop()

{

    if(menuOption == '1') {

    // Membrane 3x4 Matrix Keypad - Test Code

    //Read keypad

    char keypadmem3x4Key = keypadmem3x4.getKey();

    if (isDigit(keypadmem3x4Key) ||  keypadmem3x4Key == '*' ||  keypadmem3x4Key == '#')

    {

    Serial.print(keypadmem3x4Key);

    }

    }

    else if(menuOption == '2') {

    // 9G Micro Servo - Test Code

    // The servo will rotate to target position and back to resting position with an interval of 500 milliseconds (0.5 seconds)

    servo9g.attach(SERVO9G_PIN_SIG);         // 1. attach the servo to correct pin to control it.

    servo9g.write(servo9gTargetPosition);  // 2. turns servo to target position. Modify target position by modifying the 'ServoTargetPosition' definition above.

    delay(500);                              // 3. waits 500 milliseconds (0.5 sec). change the value in the brackets (500) for a longer or shorter delay in milliseconds.

    servo9g.write(servo9gRestPosition);    // 4. turns servo back to rest position. Modify initial position by modifying the 'ServoRestPosition' definition above.

    delay(500);                              // 5. waits 500 milliseconds (0.5 sec). change the value in the brackets (500) for a longer or shorter delay in milliseconds.

    servo9g.detach();                    // 6. release the servo to conserve power. When detached the servo will NOT hold it's position under stress.

    }

    if (millis() - time0 > timeout)

    {

        menuOption = menu();

    }


}

// Menu function for selecting the components to be tested

// Follow serial monitor for instrcutions

char menu()

{
    Serial.println(F("\nWhich component would you like to test?"));

    Serial.println(F("(1) Membrane 3x4 Matrix Keypad"));

    Serial.println(F("(2) 9G Micro Servo"));

    Serial.println(F("(menu) send anything else or press on board reset button\n"));

    while (!Serial.available());

    // Read data from serial monitor if received

    while (Serial.available())

    {

        char c = Serial.read();

        if (isAlphaNumeric(c))

        {


            if(c == '1')

    			Serial.println(F("Now Testing Membrane 3x4 Matrix Keypad"));

    		else if(c == '2')

    			Serial.println(F("Now Testing 9G Micro Servo"));

            else

            {

                Serial.println(F("illegal input!"));

                return 0;

            }

            time0 = millis();

            return c;

        }

    }

} 


