Secure Home uses Arduino UNO, ultrasonic sensor, buzzer, and led is an excellent project that combines electronics, programming, wireless communication, and the use of ultrasonic sensors in a creative manner. The ultrasonic sensor acts as the primary detection component. When an object or person comes within a range, the sensor detects this change and triggers the security response. The Arduino microcontroller processes the data from the ultrasonic sensor and activates the buzzer and LED as alarm indicators. This setup is highly customizable, allowing users to adjust the sensitivity range of the ultrasonic sensor according to their specific needs. This project is ideal for DIY enthusiasts and those looking for a reliable, scalable security solution. By combining easily accessible components with the versatile Arduino platform, the Secure Home Project offers a practical approach to home security, emphasizing simplicity, effectiveness, and user-friendliness.
The components used in this project are:
- Arduino UNO with cable
- Ultrasonic sensor
- Piezo Buzzer
- LED
- Resistor (220 ohm)
- Jumper Wires – Male to Male x 6
Male to Female x 4 - BreadBoard Small
Featured Image:

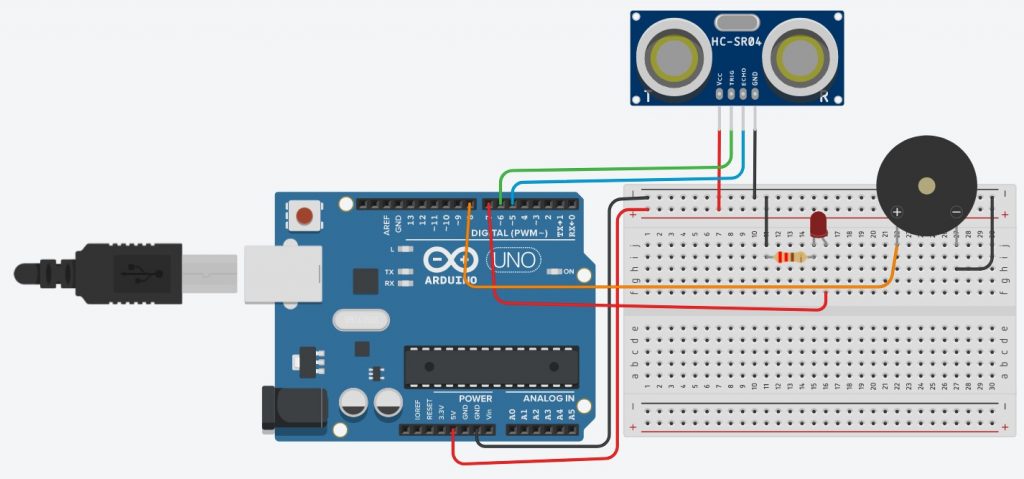
Connections with Arduino:
- Ultrasonic Sensor:
- VCC to Arduino 5V
- GND to Arduino GND
- Trig to Arduino pin 6
- Echo to Arduino pin 5
- Buzzer:
- Positive lead to Arduino pin 8
- Negative lead to Arduino GND
- LED:
- Anode (longer leg) to Arduino pin 7 (with a current-limiting resistor)
- Cathode (shorter leg) to Arduino GND
Circuit Diagram:
Code:
// Define pins for the ultrasonic sensor
const int trigPin = 6;
const int echoPin = 5;

// Define pins for the buzzer and LED
const int buzzerPin = 8;
const int ledPin = 7;

// Define the threshold distance (in centimeters)
// change the thresholdDistance value according to you
const int thresholdDistance = 50;

void setup() {
  // Initialize serial communication
  Serial.begin(9600);

  // Initialize the ultrasonic sensor pins
  pinMode(trigPin, OUTPUT);
  pinMode(echoPin, INPUT);

  // Initialize the buzzer and LED pins
  pinMode(buzzerPin, OUTPUT);
  pinMode(ledPin, OUTPUT);
}

void loop() {
  // Send a 10 microsecond pulse to the trig pin
  digitalWrite(trigPin, LOW);
  delayMicroseconds(2);
  digitalWrite(trigPin, HIGH);
  delayMicroseconds(10);
  digitalWrite(trigPin, LOW);

  // Measure the echo pin pulse width
  long duration = pulseIn(echoPin, HIGH);

  // Calculate the distance in centimeters
  int distance = duration * 0.034 / 2;

  // Print the distance to the serial monitor
  Serial.print("Distance: ");
  Serial.print(distance);
  Serial.println(" cm");

  // Check if the distance is below the threshold
  if (distance < thresholdDistance) {
    // Activate the buzzer and LED
    digitalWrite(buzzerPin, HIGH);
    digitalWrite(ledPin, HIGH);
  } else {
    // Deactivate the buzzer and LED
    digitalWrite(buzzerPin, LOW);
    digitalWrite(ledPin, LOW);
  }

  // Small delay before the next loop
  delay(100);
}


