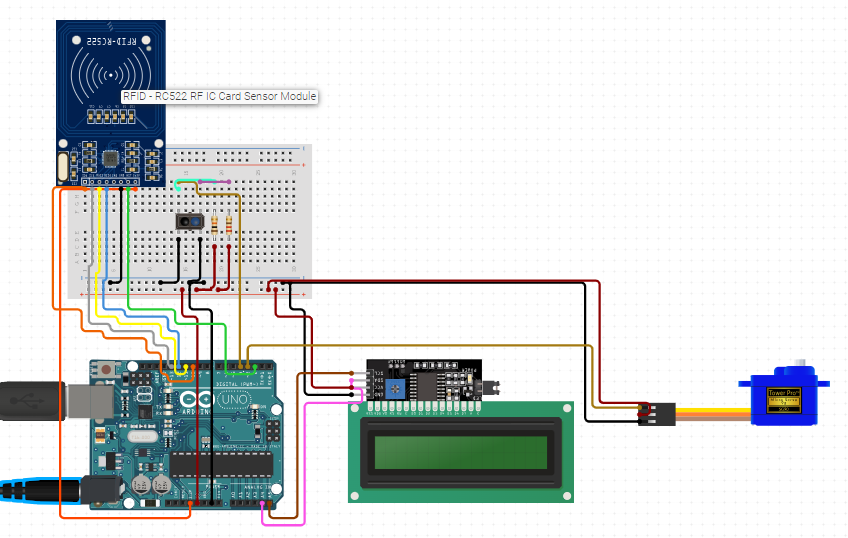
| The RFID Door Lock System is an advanced security solution integrating Arduino, RFID technology, an IR sensor, and a servo motor to provide secure and convenient access control. This project is designed to enhance security by allowing only authorized RFID tags to unlock the door, while the IR sensor ensures the door only operates when a person is detected nearby. Components List: Arduino Uno: The central microcontroller that processes input from the RFID reader and IR sensor, and controls the servo motor. RFID Module (e.g., RC522): Reads RFID tags and sends the information to the Arduino for verification. IR Sensor: Detects the presence of a person to ensure the system activates only when someone is near the door. Servo Motor: Mechanically operates the door lock, locking or unlocking based on Arduino commands. Power Supply: Typically a 5V power source for the Arduino and servo motor. Breadboard and Connecting Wires: For prototyping and connecting components. Jumper Wires: Male-to-Male: 16 Male-to-Female: 5 Female-to-Female: 0. Description: The RFID Door Lock System operates by using the RFID module to read the unique identifier of an RFID tag. When a tag is scanned, the Arduino verifies if it is authorized. If the tag is valid, and the IR sensor detects a person nearby, the Arduino sends a signal to the servo motor to unlock the door. If the tag is invalid or no person is detected, the door remains locked. This dual verification method enhances security by ensuring that only authorized users can unlock the door when they are physically present. Uses and Applications: Home Security: Enhances the safety of residential properties by restricting access to authorized individuals. Office Access Control: Manages entry to secure areas in office buildings, allowing only employees with registered RFID tags. School and University Facilities: Controls access to laboratories, classrooms, or restricted areas, ensuring only students and staff with permission can enter. Warehouse Management: Secures storage areas, providing access only to personnel with authorized RFID tags. The RFID Door Lock System offers a reliable and user-friendly solution for access control, combining convenience with enhanced security. It is an excellent project for learning about RFID technology, microcontroller programming, and automation in security systems. |
// Include Libraries
#include "Arduino.h"
#include "LiquidCrystal_PCF8574.h"
#include "RFID.h"
#include "Servo.h"
#include "Button.h"


// Pin Definitions
#define RFID_PIN_RST  2
#define RFID_PIN_SDA  10
#define SERVO9G_PIN_SIG 3
#define REFLECTIVEIR_PIN_COLL 4


// Global variables and defines
// There are several different versions of the LCD I2C adapter, each might have a different address.
// Try the given addresses by Un/commenting the following rows until LCD works follow the serial monitor prints.
// To find your LCD address go to: http://playground.arduino.cc/Main/I2cScanner and run example.
#define LCD_ADDRESS 0x3F
//#define LCD_ADDRESS 0x27
// Define LCD characteristics
#define LCD_ROWS 2
#define LCD_COLUMNS 16
#define SCROLL_DELAY 150
#define BACKLIGHT 255
const int servo9gRestPosition   = 20;  //Starting position
const int servo9gTargetPosition = 150; //Position when event is detected
// object initialization
LiquidCrystal_PCF8574 lcdI2C;
RFID rfid(RFID_PIN_SDA,RFID_PIN_RST);
Servo servo9g;
Button ReflectiveIR(REFLECTIVEIR_PIN_COLL);


// define vars for testing menu
const int timeout = 10000;       //define timeout of 10 sec
char menuOption = 0;
long time0;

// Setup the essentials for your circuit to work. It runs first every time your circuit is powered with electricity.
void setup()
{
    // Setup Serial which is useful for debugging
    // Use the Serial Monitor to view printed messages
    Serial.begin(9600);
    while (!Serial) ; // wait for serial port to connect. Needed for native USB
    Serial.println("start");

    // initialize the lcd
    lcdI2C.begin(LCD_COLUMNS, LCD_ROWS, LCD_ADDRESS, BACKLIGHT);
    //initialize RFID module
    rfid.init();
    servo9g.attach(SERVO9G_PIN_SIG);
    servo9g.write(servo9gRestPosition);
    delay(100);
    servo9g.detach();
    ReflectiveIR.init();
    menuOption = menu();

}

// Main logic of your circuit. It defines the interaction between the components you selected. After setup, it runs over and over again, in an eternal loop.
void loop()
{


    if(menuOption == '1') {
    // LCD 16x2 I2C - Test Code
    // The LCD Screen will display the text of your choice.
    lcdI2C.clear();                          // Clear LCD screen.
    lcdI2C.print("  Circuito.io  ");                   // Print print String to LCD on first line
    lcdI2C.selectLine(2);                    // Set cursor at the begining of line 2
    lcdI2C.print("     Rocks!  ");                   // Print print String to LCD on second line
    delay(1000);

    }
    else if(menuOption == '2') {
    // RFID Card Reader - RC522 - Test Code
    //Read RFID tag if present
    String rfidtag = rfid.readTag();
    //print the tag to serial monitor if one was discovered
    rfid.printTag(rfidtag);

    }
    else if(menuOption == '3') {
    // 9G Micro Servo - Test Code
    // The servo will rotate to target position and back to resting position with an interval of 500 milliseconds (0.5 seconds)
    servo9g.attach(SERVO9G_PIN_SIG);         // 1. attach the servo to correct pin to control it.
    servo9g.write(servo9gTargetPosition);  // 2. turns servo to target position. Modify target position by modifying the 'ServoTargetPosition' definition above.
    delay(500);                              // 3. waits 500 milliseconds (0.5 sec). change the value in the brackets (500) for a longer or shorter delay in milliseconds.
    servo9g.write(servo9gRestPosition);    // 4. turns servo back to rest position. Modify initial position by modifying the 'ServoRestPosition' definition above.
    delay(500);                              // 5. waits 500 milliseconds (0.5 sec). change the value in the brackets (500) for a longer or shorter delay in milliseconds.
    servo9g.detach();                    // 6. release the servo to conserve power. When detached the servo will NOT hold it's position under stress.
    }
    else if(menuOption == '4') {
    // Reflective IR Sensor TCRT5000L - Test Code
    //read Reflective IR Sensor.
    //if the sensor detects an echo function will return LOW (0).
    //if it is not detect an echo function will return HIGH (1).
    bool ReflectiveIR_Val = ReflectiveIR.read();
    Serial.print(F("Val: ")); Serial.println(ReflectiveIR_Val);
    }

    if (millis() - time0 > timeout)
    {
        menuOption = menu();
    }

}


// Menu function for selecting the components to be tested
// Follow serial monitor for instrcutions
char menu()
{

    Serial.println(F("\nWhich component would you like to test?"));
    Serial.println(F("(1) LCD 16x2 I2C"));
    Serial.println(F("(2) RFID Card Reader - RC522"));
    Serial.println(F("(3) 9G Micro Servo"));
    Serial.println(F("(4) Reflective IR Sensor TCRT5000L"));
    Serial.println(F("(menu) send anything else or press on board reset button\n"));
    while (!Serial.available());

    // Read data from serial monitor if received
    while (Serial.available())
    {
        char c = Serial.read();
        if (isAlphaNumeric(c))
        {

            if(c == '1')
          Serial.println(F("Now Testing LCD 16x2 I2C"));
        else if(c == '2')
          Serial.println(F("Now Testing RFID Card Reader - RC522"));
        else if(c == '3')
          Serial.println(F("Now Testing 9G Micro Servo"));
        else if(c == '4')
          Serial.println(F("Now Testing Reflective IR Sensor TCRT5000L"));
            else
            {
                Serial.println(F("illegal input!"));
                return 0;
            }
            time0 = millis();
            return c;
        }
    }
}


