“Pad Bot” is an ingenious project designed to streamline the process of receiving packages or pads in an office or household setting. Utilizing advanced technology, including an Arduino microcontroller, ultrasonic sensor, LCD display, and red and green LEDs, this system revolutionizes package delivery management.
At its core, the Pad Bot serves as an automated delivery assistant. When a package or pad approaches within range, the ultrasonic sensor detects its presence and triggers the system. Simultaneously, the green LED illuminates, indicating readiness for delivery.
Upon detection, the Pad Bot promptly dispenses the package or pad, offering convenience and efficiency. Meanwhile, the LCD display provides real-time feedback, showcasing the count of packages delivered, ensuring accurate tracking and management.
The integration of red and green LEDs offers intuitive visual cues for users. The green LED signals successful package detection and readiness for delivery, while the red LED may indicate errors or maintenance requirements, ensuring smooth operation and user-friendly interaction.
Moreover, the Arduino microcontroller orchestrates the entire process seamlessly, leveraging its programming capabilities to control the system’s components effectively. Its versatility allows for customization to suit specific needs and preferences, making it adaptable for various environments and applications.
The Pad Bot represents a paradigm shift in package delivery management, offering a hands-free, efficient solution to streamline operations and enhance user experience. With its intelligent design and intuitive functionality, it promises to revolutionize how packages are received and managed, ushering in a new era of convenience and efficiency.
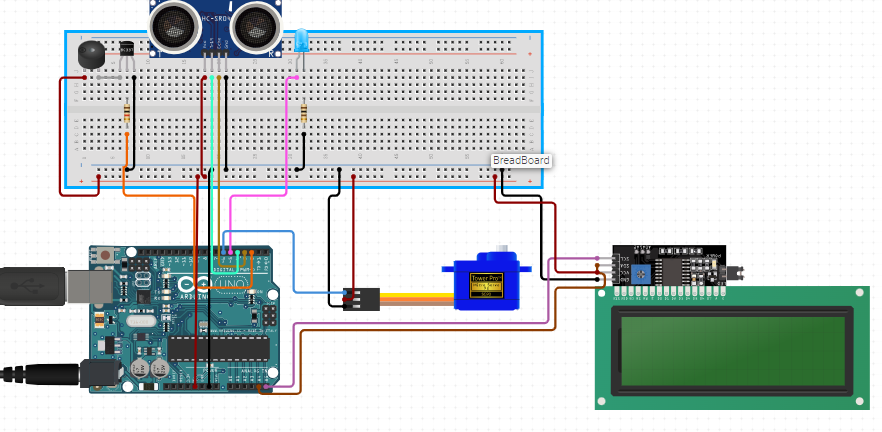
COMPONENTS LIST –
1.ARDUINO UNO
2. ULTRASONIC SENSOR
3. I2C LCD
4. BATTERY
5. LED
6.BUZZER
7. JUMPER WIRES – M-M(11), M-F(7)
8.Servo motor
#include <Wire.h>
#include <LiquidCrystal_I2C.h>

// Define pin connections
#define TRIG_PIN 4
#define ECHO_PIN 3
#define LED_PIN 5
#define BUZZER_PIN 2

// Initialize LCD with I2C address
LiquidCrystal_I2C lcd(0x27, 16, 2);

void setup() {
  // Initialize Serial Monitor for debugging
  Serial.begin(9600);

  // Initialize LCD
  lcd.begin(16, 2);
  lcd.backlight();
  lcd.print("Padbot Ready");

  // Set pin modes
  pinMode(TRIG_PIN, OUTPUT);
  pinMode(ECHO_PIN, INPUT);
  pinMode(LED_PIN, OUTPUT);
  pinMode(BUZZER_PIN, OUTPUT);

  // Turn off LED and Buzzer initially
  digitalWrite(LED_PIN, LOW);
  digitalWrite(BUZZER_PIN, LOW);

  // Brief delay to allow LCD to initialize
  delay(1000);
}

void loop() {
  // Read distance from ultrasonic sensor
  long duration, distance;
  digitalWrite(TRIG_PIN, LOW);
  delayMicroseconds(2);
  digitalWrite(TRIG_PIN, HIGH);
  delayMicroseconds(10);
  digitalWrite(TRIG_PIN, LOW);

  duration = pulseIn(ECHO_PIN, HIGH);
  distance = (duration / 2) / 29.1; // Convert to cm

  // Display distance on LCD
  lcd.clear();
  lcd.setCursor(0, 0);
  lcd.print("Distance: ");
  lcd.print(distance);
  lcd.print(" cm");

  // Respond to obstacle detection
  if (distance < 10) { // If an object is detected within 10 cm
    digitalWrite(LED_PIN, HIGH);  // Turn on LED
    digitalWrite(BUZZER_PIN, HIGH);  // Turn on buzzer
    lcd.setCursor(0, 1);
    lcd.print("Obstacle!");
  } else {
    digitalWrite(LED_PIN, LOW);  // Turn off LED
    digitalWrite(BUZZER_PIN, LOW);  // Turn off buzzer
  }

  // Print distance to Serial Monitor
  Serial.print("Distance: ");
  Serial.print(distance);
  Serial.println(" cm");

  // Brief delay before next loop
  delay(500);
}


