The Object Follower robot uses an Arduino Uno, two HC-SR04 ultrasonic sensors, and a servo motor to follow an object. This project aims to detect an object, like a hand, and have the servo motor follow its movement within a certain range. The ultrasonic sensors measure distance precisely, and the servo motor controls the movement. By positioning the sensors for a broad field of view, the robot accurately detects the object’s location. When the sensors detect an object, they calculate its distance and direction. The Arduino processes this data and adjusts the servo motor’s angle to follow the object’s movement. This project uses basic components such as jumper wires, a breadboard, and power connections, making it accessible and easy to assemble. It demonstrates Arduino’s potential in creating interactive and responsive systems, serving as a foundation for more complex robotics projects.
Components used in this project are:
- Arduino UNO with cable
- Ultrasonic sensor x 2
- Servo Motor SG90s
- Jumper wires – Male to Male x 16
Male to Female x 8 - Full-size Breadboard
Arduino UNO
Function: The microcontroller for the entire project is the Arduino Uno. It reads inputs from ultrasonic sensors, processes the data, and sends commands to the servo motor. Acting as the brain of the project, it executes the code to make the object-following system work.
Ultrasonic Sensors (HC-SR04)
Function: The two ultrasonic sensors are used to measure the distance to objects in front of them. Each sensor is positioned to cover a different area, allowing the system to determine the direction of the object based on the distance readings from both sensors.
Servo Motor (SG90s)
Function: The servo motor is used to move the system to follow the detected object. It receives commands from the Arduino to rotate to a specific angle. The angle of the servo motor is adjusted based on the difference in distances measured by the two ultrasonic sensors, allowing the system to follow the object as it moves.
Pin Connections:
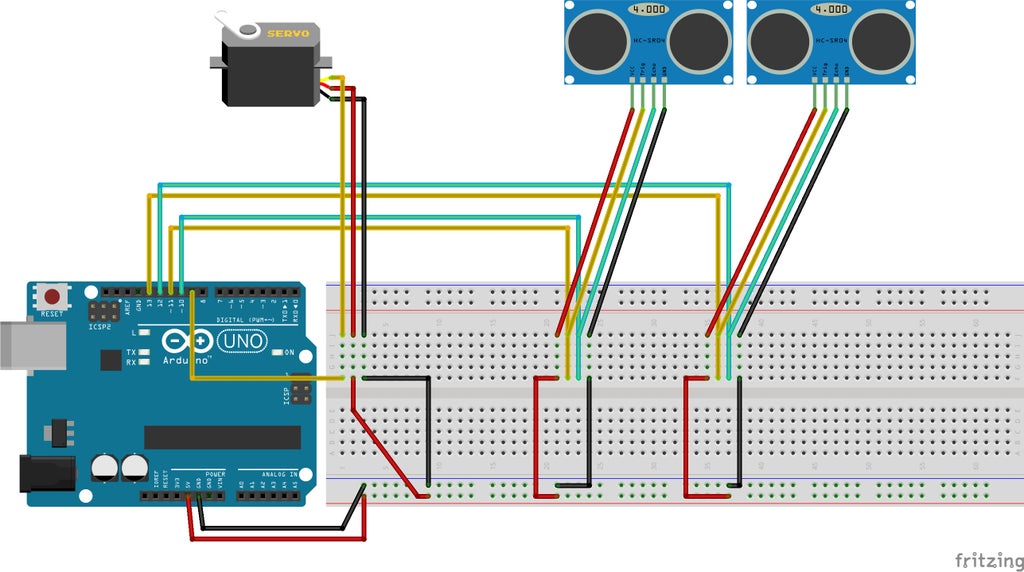
- Connect the VCC and GND of both ultrasonic sensors to the 5V and GND pins of the Arduino.
- Connect the Trig and Echo pins of the first ultrasonic sensor to digital pins 11 and 10, respectively.
- Connect the Trig and Echo pins of the second ultrasonic sensor to digital pins 13 and 12, respectively.
- Connect the control pin of the servo motor to digital pin 9 of the Arduino.
- Connect the power and ground of the servo to the 5V and GND pins of the Arduino.
Featured Image:

Circuit Diagram:
Code:
#include <Servo.h>

Servo myservo;

const int Lin = 10, Rin = 12, Lout = 11, Rout = 13, serv = 9; //setting sensor pins and servo pin

// establish variables for duration
// and the distance result in inches
long Rduration, Lduration, Rinches, Linches;

int threshold = 10; //Sensor threshold in inches

int angle = 80; //Initial angle

boolean debug = false; //Serial communication for debuging. Set to true for serial communication.

void setup() {
  // initialize serial communication:
  if (debug)
  {
    Serial.begin(9600);
  }
  myservo.attach(9); //attach servo to pin 9
}

void loop()
{
  pinMode(Rout, OUTPUT);
  digitalWrite(Rout, LOW);
  delayMicroseconds(2);
  digitalWrite(Rout, HIGH);
  delayMicroseconds(5);
  digitalWrite(Rout, LOW);

  Rduration = pulseIn(Rin, HIGH);

  pinMode(Lout, OUTPUT);
  digitalWrite(Lout, LOW);
  delayMicroseconds(2);
  digitalWrite(Lout, HIGH);
  delayMicroseconds(5);
  digitalWrite(Lout, LOW);

  Lduration = pulseIn(Lin, HIGH);

  // convert the time into a distance
  Rinches = microsecondsToInches(Rduration);
  Linches = microsecondsToInches(Lduration);

  if (debug)
  {
    Serial.print("Left: ");
    Serial.print(Linches);
    Serial.println(" in");
    Serial.print("Right: ");
    Serial.print(Rinches);
    Serial.println(" in");
  }
  follow();

}

long microsecondsToInches(long microseconds)
{
  return microseconds / 74 / 2;
}

void follow()
{
  if (Linches <= threshold || Rinches <= threshold)
  {
    if (Linches + 2 < Rinches)
    {
      angle = angle - 2;
    }
    if (Rinches + 2 < Linches)
    {
      angle = angle + 2;
    }
  }
  if (angle > 160)
  {
    angle = 160;
  }
  if (angle < 0)
  {
    angle = 0;
  }
  myservo.write(angle);

}


