In our modern world, managing waste effectively is a growing challenge. Non-biodegradable waste, such as plastics and metals, poses significant environmental threats, leading to pollution and overflowing landfills. Traditional waste sorting methods are labor-intensive and often inefficient, resulting in poor recycling rates and increased environmental harm. There is a pressing need for innovative solutions to automate and improve waste segregation processes, thereby enhancing recycling efficiency and reducing ecological footprints. Non Biodegradable Waste Separator project offers a smart and efficient solution for waste management. By automating the separation of non-biodegradable materials, it significantly improves recycling rates, reduces manual labor, and minimizes environmental pollution. This innovative approach promotes sustainability, helping to create a cleaner, greener future for our communities.
Required Components:
- Arduino UNO x1
- Servo Motors (x2)
- Ultrasonic Sensor x1
- DC Motor x1
- 9V Battery x1
- Breadboard x1
- Connecting Wires
Components and their functions:
- Arduino UNO: The Arduino UNO is a microcontroller board that act as the brain of the waste separator, controlling sensors and motors based on programmed instructions.
- Servo Motors : These motors are used to position sorting mechanisms or flaps accurately, directing waste into the correct bins based on sensor inputs.
- Ultrasonic Sensor: This sensor detects the presence and distance of waste items, triggering sorting actions when waste is identified.
- DC Motor: This motor drives the shaft attached with the DC motor or rotating mechanism that moves waste items towards the sorting area.
- 9V Battery: This battery provides the necessary power supply for the Arduino and connected components, ensuring the system operates independently.
- Breadboard: A breadboard is used for prototyping and connecting all electronic components without soldering, making it easy to modify the circuit.
- Connecting Wires: These wires connect various components to the Arduino and breadboard, enabling communication and power distribution throughout the system.
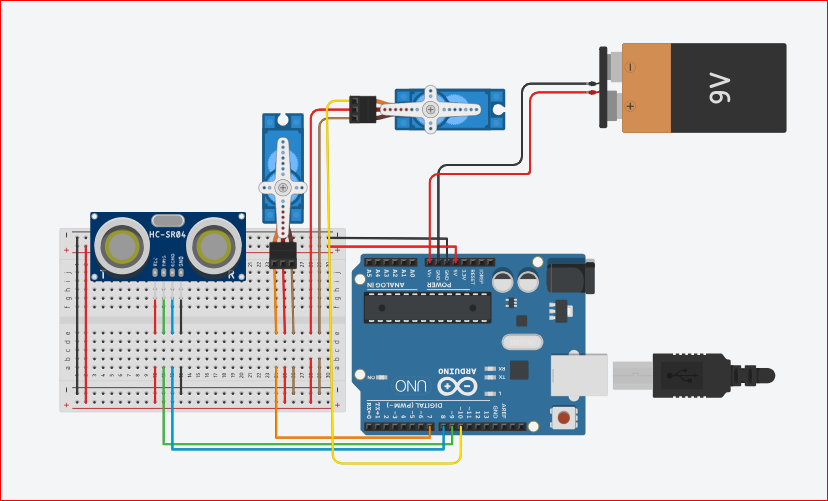
Steps to Assemble the Circuit
Connect the Servos:
- Attach the signal wire of the first servo motor to pin 7 on the Arduino.
- Attach the signal wire of the second servo motor to pin 10 on the Arduino.
- Connect the power and ground wires of both servo motors to the 5V and GND pins on the Breadboard.
Connect the Ultrasonic Sensor:
- Connect the Trig pin of the ultrasonic sensor to pin 9 on the Arduino.
- Connect the Echo pin of the ultrasonic sensor to pin 8 on the Arduino.
- Connect the VCC pin of the ultrasonic sensor to the positive rails of the breadboard.
- Connect the GND pin of the ultrasonic sensor to the positive rails of the breadboard.
Power the Arduino:
- Connect the 9V battery to the Arduino using a battery connector.
- Attach the positive wire of the battery connector to the Vin pin on the Arduino.
- Attach the negative wire of the battery connector to a GND pin on the Arduino.
Breadboard:
- Connect the 5V pin from the Arduino to the positive rail of the breadboard.
- Connect a GND pin from the Arduino to the negative rail of the breadboard.
- Distribute power and ground connections to the servo motors and ultrasonic sensor from the breadboard rails.
#include <Servo.h>

Servo myservo1;  // Existing servo motor
Servo myservo2;  // New servo motor

const int trigPin = 9;
const int echoPin = 8;
long tmeduration;
int distance;

void setup() {
  myservo1.attach(7);  // Attach the first servo to pin 7
  myservo2.attach(10); // Attach the second servo to pin 10
  pinMode(trigPin, OUTPUT);
  pinMode(echoPin, INPUT);
  Serial.begin(9600);
}

void loop() {
  // Send ultrasonic pulse
  digitalWrite(trigPin, LOW);
  delayMicroseconds(2);
  digitalWrite(trigPin, HIGH);
  delayMicroseconds(10);
  digitalWrite(trigPin, LOW);

  // Measure the duration of the echo pulse
  tmeduration = pulseIn(echoPin, HIGH);
  // Calculate distance
  distance = (0.034 * tmeduration) / 2;

  // Control the first servo based on distance
  if (distance <= 200) {
    myservo1.write(90);
  } else {
    myservo1.write(0);
  }

  // Control the second servo based on distance
  // Here, I'm using the same logic as the first servo.
  // Modify this according to your specific requirements.
  if (distance <= 200) {
    myservo2.write(90);
  } else {
    myservo2.write(0);
  }

  // Print the distance for debugging
  Serial.print("Distance: ");
  Serial.println(distance);

  // Wait for a short period before next measurement
  delay(500);
}


