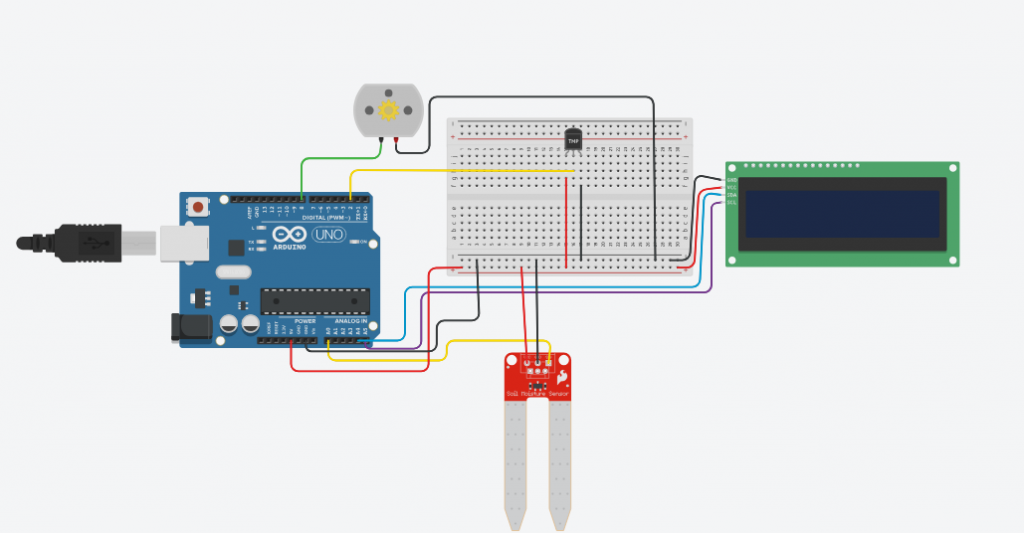
| An automatic irrigation system uses sensors to monitor environmental conditions and soil moisture levels, activating irrigation only when necessary. This optimizes water usage and ensures plants receive adequate hydration. The primary components are an Arduino microcontroller, a soil moisture sensor, a humidity sensor, a relay module, and a water pump. Components and Their Functions Arduino Uno: Function: Acts as the central processing unit, reading sensor data and controlling the water pump. Working: Processes input from the soil moisture sensor and humidity sensor, and activates or deactivates the relay module based on predefined conditions. Soil Moisture Sensor (e.g., Capacitive Soil Moisture Sensor or Resistive Soil Moisture Sensor): Function: Measures the moisture content in the soil. Working: Provides an analog or digital signal corresponding to the soil’s moisture level, which the Arduino reads to determine if the soil is dry or wet. Humidity Sensor (e.g., DHT11 or DHT22): Function: Measures the ambient humidity and temperature. Working: Sends digital signals to the Arduino, providing data on the surrounding environment’s humidity and temperature. Relay Module: Function: Acts as a switch to control the water pump based on signals from the Arduino. Working: When the Arduino sends a signal to the relay module, it closes the circuit, allowing current to flow to the water pump. Water Pump: Function: Pumps water to the irrigation system. Working: Operates when the relay module closes the circuit, delivering water to the plants. Power Supply: Function: Powers the Arduino, sensors, relay module, and water pump. Working: Usually consists of a combination of USB power for the Arduino and an external power source for the water pump. Connecting Wires: Function: Connect various components to the Arduino and each other. Working: Transmit power and signals between components. Breadboard (optional): Function: For prototyping and making temporary connections between components. Working: Simplifies the process of connecting the circuit components without soldering. Working Description of the Automatic Irrigation System Initialization: The Arduino initializes the sensors and sets up the input and output pins. The soil moisture sensor and humidity sensor begin monitoring the environmental conditions. Data Collection: The soil moisture sensor continuously measures the soil’s moisture level, providing an analog or digital signal to the Arduino. The humidity sensor measures the ambient humidity and temperature, sending digital data to the Arduino. Decision Making: The Arduino processes the sensor data. If the soil moisture level falls below a predefined threshold (indicating dry soil) and the humidity level is also low, the Arduino decides to activate the irrigation system. If the soil moisture level is above the threshold (indicating sufficient moisture), the Arduino does not activate the irrigation system. Irrigation Activation: When the soil is dry and humidity is low, the Arduino sends a signal to the relay module to close the circuit. The relay module activates the water pump, which then waters the plants for a set period or until the soil moisture sensor detects adequate moisture levels |
 // Libraries

#include <DHT.h>

#include <Wire.h>

#include <LiquidCrystal_I2C.h>


// Define pins

#define DHT_PIN 2                // Digital pin for DHT sensor

#define SOIL_MOISTURE_PIN A0     // Analog pin for soil moisture sensor


// Define sensor types and parameters

#define DHT_TYPE DHT11           // DHT sensor type

#define WATER_THRESHOLD 500      // Threshold value for soil moisture sensor


// Define watering parameters

#define WATER_DURATION 5000      // Watering duration in milliseconds

#define WATER_PIN 8              // Digital pin for controlling water pump/valve


// LCD parameters

#define LCD_COLUMNS 16

#define LCD_ROWS 2

#define I2C_ADDRESS 0x27         // I2C address of the LCD module


// Initialize sensors

DHT dht(DHT_PIN, DHT_TYPE);

LiquidCrystal_I2C lcd(I2C_ADDRESS, LCD_COLUMNS, LCD_ROWS);


void setup() {

  // Initialize serial communication

  Serial.begin(9600);


  // Initialize DHT sensor

  dht.begin();


  // Set moisture sensor pin as input

  pinMode(SOIL_MOISTURE_PIN, INPUT);


  // Set water pump pin as output

  pinMode(WATER_PIN, OUTPUT);


  // Initialize LCD

  lcd.init();

  lcd.backlight();

}


void loop() {

  // Read temperature and humidity from DHT sensor

  float humidity = dht.readHumidity();

  float temperature = dht.readTemperature();


  // Check if humidity and temperature readings are valid

  if (isnan(humidity) || isnan(temperature)) {

    Serial.println("Failed to read from DHT sensor!");

    return;

  }


  // Read soil moisture level

  int soilMoisture = analogRead(SOIL_MOISTURE_PIN);


  // Check if soil moisture level is below threshold

  if (soilMoisture < WATER_THRESHOLD) {

    // Activate water pump

    digitalWrite(WATER_PIN, HIGH);

    Serial.println("Watering...");

    delay(WATER_DURATION); // Water for predefined duration

    // Deactivate water pump

    digitalWrite(WATER_PIN, LOW);

    Serial.println("Watering finished.");

  }


  // Display sensor readings on LCD

  lcd.clear();

  lcd.setCursor(0, 0);

  lcd.print("Humidity: ");

  lcd.print(humidity);

  lcd.print("%");

  lcd.setCursor(0, 1);

  lcd.print("Moisture: ");

  lcd.print(soilMoisture);


  // Print sensor readings to serial monitor

  Serial.print("Humidity: ");

  Serial.print(humidity);

  Serial.print("%\t Temperature: ");

  Serial.print(temperature);

  Serial.print("°C\t Soil Moisture: ");

  Serial.println(soilMoisture);


  // Delay before next iteration

  delay(2000); // Adjust delay as needed

}


