Narshimha Smart City Project we developed an automatic gate using an Arduino-based system integrated with a DIY Mechatron Kit. The key components of our setup included an ultrasonic sensor (HC-SR04) for distance measurement, a servo motor for gate movement, and the Arduino Uno microcontroller for processing and control.
The ultrasonic sensor was positioned to detect approaching objects, such as vehicles or people. When the sensor detected an object within a predefined range, it triggered the servo motor to open the gate. The sensor continuously monitored the area, and once the object moved away, the servo motor automatically closed the gate.
We utilized the Mechatron Kit, which provided a robust mechanical structure for the gate. The kit included all necessary components, such as gears, levers, and mounting brackets, which made the assembly straightforward and ensured the gate’s smooth operation.
The Arduino code was designed to read the distance data from the ultrasonic sensor, map this data to the servo motor’s movement range, and control the servo’s position based on the object’s proximity. This setup ensured the gate opened and closed efficiently and automatically, enhancing convenience and security.
Overall, this project demonstrated a practical application of integrating electronics and mechanical components to create an automated system, showcasing the potential of DIY kits in educational and real-world contexts.
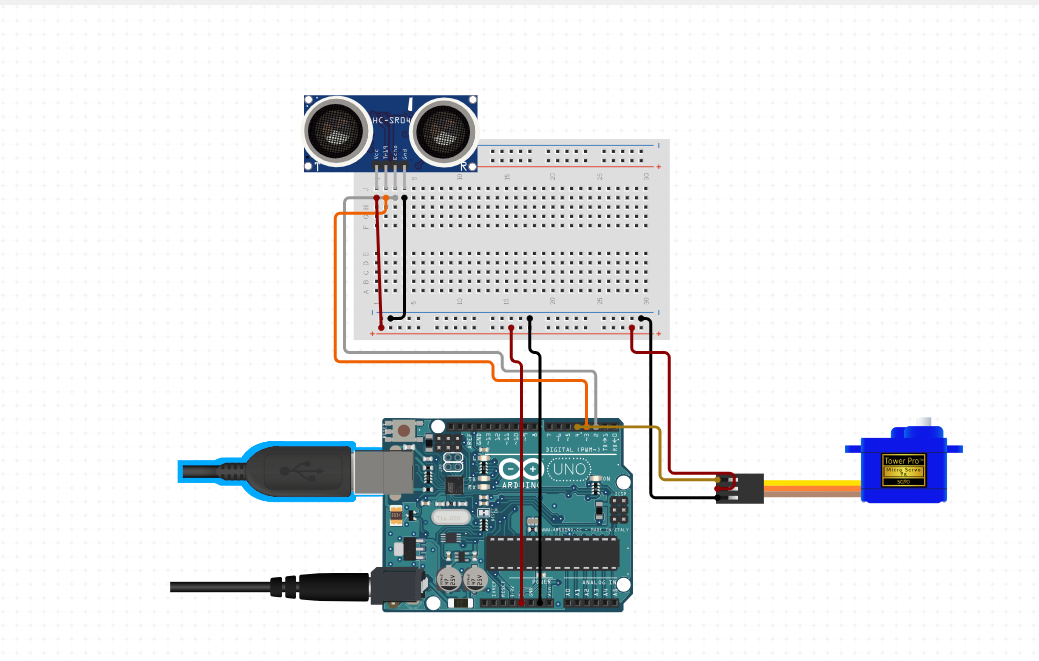
Components Needed:
- Arduino board (e.g., Arduino Uno)
- Ultrasonic sensor (e.g., HC-SR04)
- Servo motor
- Jumper wires
- Breadboard
Wiring:
- Ultrasonic Sensor (HC-SR04):
- VCC to 5V on Arduino
- GND to GND on Arduino
- TRIG to Digital Pin 3 on Arduino
- ECHO to Digital Pin 2 on Arduino
- Servo Motor:
- VCC to 5V on Arduino
- GND to GND on Arduino
- Signal to Digital Pin 4 on Arduino
#include <Servo.h>

// Define pins for the ultrasonic sensor
const int trigPin = 3;
const int echoPin = 2;

// Define variable for the servo
Servo myServo;

// Variable to store the duration and distance
long duration;
int distance;

void setup() {
  // Initialize serial communication
  Serial.begin(9600);

  // Set the trigPin as OUTPUT and echoPin as INPUT
  pinMode(trigPin, OUTPUT);
  pinMode(echoPin, INPUT);

  // Attach the servo on pin 4
  myServo.attach(4);
}

void loop() {
  // Clear the trigPin
  digitalWrite(trigPin, LOW);
  delayMicroseconds(2);

  // Set the trigPin high for 10 microseconds
  digitalWrite(trigPin, HIGH);
  delayMicroseconds(10);
  digitalWrite(trigPin, LOW);

  // Read the echoPin and calculate the distance
  duration = pulseIn(echoPin, HIGH);
  distance = duration * 0.034 / 2;

  // Print the distance to the Serial Monitor
  Serial.print("Distance: ");
  Serial.print(distance);
  Serial.println(" cm");

  // Map the distance to a servo angle (0-180 degrees)
  int servoAngle = map(distance, 0, 200, 0, 180);

  // Limit the angle between 0 and 180
  servoAngle = constrain(servoAngle, 0, 180);

  // Set the servo to the mapped angle
  myServo.write(servoAngle);

  // Wait for 100 milliseconds before the next loop
  delay(100);
}