The Museum of Horror prototype is an innovative, interactive experience built using Arduino technology, designed to deliver a spine-chilling and immersive adventure for visitors. At the heart of the museum’s interactive exhibits is the Arduino Uno microcontroller, which controls the various sensors, actuators, and lighting systems that bring the exhibits to life.
Upon entering, visitors are greeted by dimly lit corridors where LED strips, controlled via Arduino, simulate flickering lights, casting eerie shadows on the walls. The light intensity is adjusted using relays to create a sense of unease. Motion detection is achieved with infrared sensors, which trigger sudden bursts of sound or movement, enhancing the fear factor. Hidden Bo-motors power mechanical props such as haunted dolls or floating objects, while servo motors are used to animate creatures or simulate doors opening slowly, as if by some unseen force.
Certain exhibits are equipped with pressure sensors beneath the floor or near haunted artifacts. When triggered, these sensors activate relays connected to sound modules, causing terrifying sound effects or ghostly whispers to fill the air. Servo motors may also control the subtle movements of animatronics, such as swinging pendulums or rotating heads, making the objects appear alive.
Each component works in unison to heighten the atmosphere of suspense, leaving visitors on edge as they make their way through the haunted experience.
#include <Servo.h>
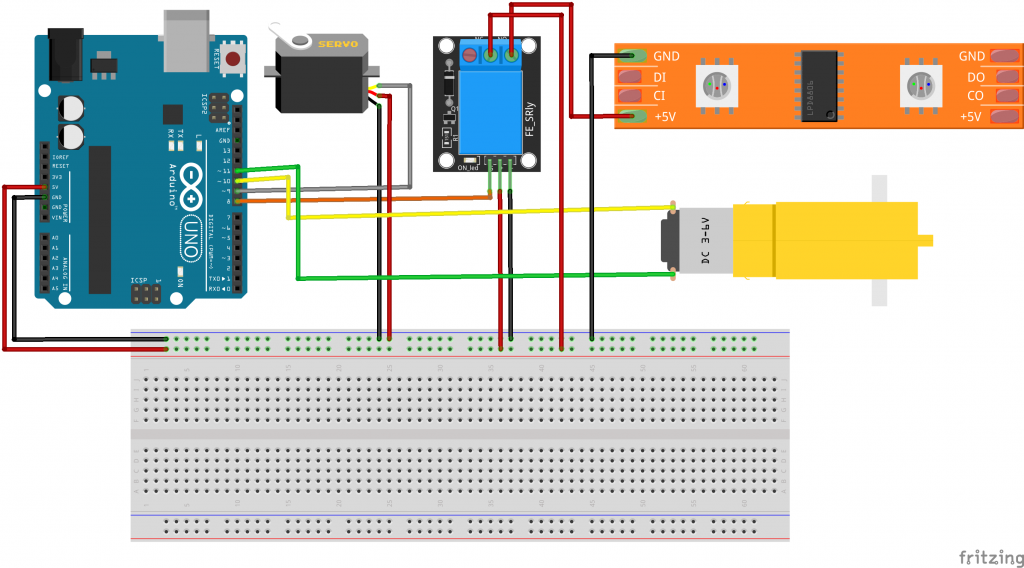
#define relay 8
#define SERVO_PIN 9
#define BO_MOTOR_PIN_1 10
#define BO_MOTOR_PIN_2 11
Servo servoMotor;
void setup() {
servoMotor.attach(SERVO_PIN);
pinMode(BO_MOTOR_PIN_1, OUTPUT);
pinMode(BO_MOTOR_PIN_2, OUTPUT);
pinMode(relay, OUTPUT);
}
void loop() {
// Move servo to 90 degrees
servoMotor.write(90);
digitalWrite(relay,HIGH);
delay(1000); // Wait for 1 second
// Rotate BO motor clockwise for 1 rotation
rotateClockwise();
// Move servo to -90 degrees
servoMotor.write(-90);
digitalWrite(relay,LOW);
delay(1000); // Wait for 1 second
// Rotate BO motor anti-clockwise for 1 rotation
rotateAntiClockwise();
}
void rotateClockwise() {
digitalWrite(BO_MOTOR_PIN_1, HIGH);
digitalWrite(BO_MOTOR_PIN_2, LOW);
delay(1000); // Wait for 1 second
digitalWrite(BO_MOTOR_PIN_1, LOW);
digitalWrite(BO_MOTOR_PIN_2, LOW);
}
void rotateAntiClockwise() {
digitalWrite(BO_MOTOR_PIN_1, LOW);
digitalWrite(BO_MOTOR_PIN_2, HIGH);
delay(1000); // Wait for 1 second
digitalWrite(BO_MOTOR_PIN_1, LOW);
digitalWrite(BO_MOTOR_PIN_2, LOW);
}


