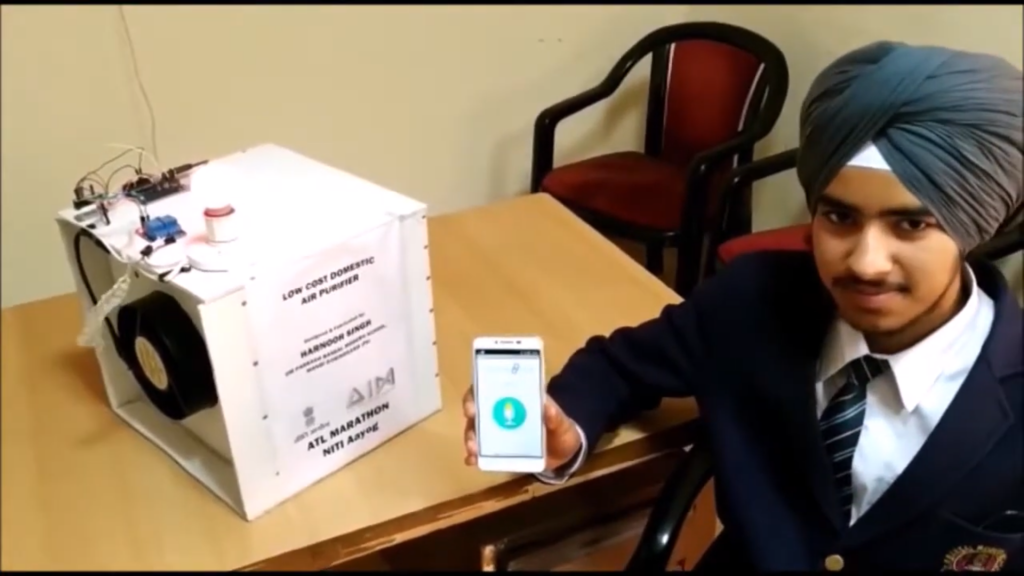
The low-cost domestic air purifier uses Arduino technology. The air purifier consists of various types of air filters through which air passes to remove pollutants and clean the air effectively. This device is designed to be wirelessly operated via a Bluetooth module. The Bluetooth module receives signals and sends them to a relay, which then triggers the fan to circulate air through the filters. By utilizing Arduino and Bluetooth technology, the air purifier ensures easy and efficient operation, making clean air more accessible and affordable for households. The low-cost domestic air purifier project aims to improve indoor air quality and promote healthier living environments at a minimal cost.
Components used in this project are:
- Arduino UNO with cable
- Single Channel Relay x 2
- Bluetooth Module HC-05
- DC Fan
- Male to Female jumper wires x 10
- Male to Male jumper wires x 4
Featured Image:
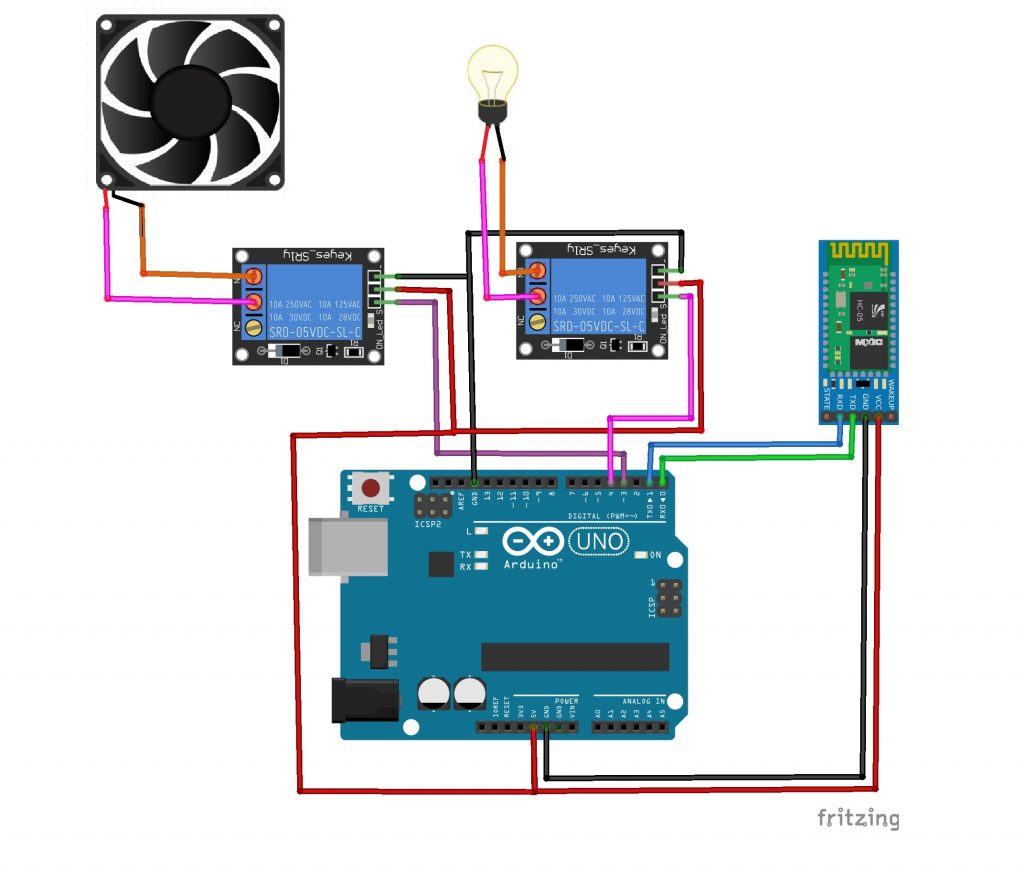
Pin Connection:
Arduino Uno:
- Digital Pin 3: Connected to Relay 1 Control Pin
- Digital Pin 4: Connected to Relay 2 Control Pin
- 5V Pin: Connected to VCC of HC-05 Bluetooth Module
- GND Pin: Connected to GND of HC-05 Bluetooth Module
HC-05 Bluetooth Module:
- VCC: Connected to 5V Pin of Arduino Uno
- GND: Connected to GND Pin of Arduino Uno
- TXD: Connected to RX Pin (Digital Pin 0) of Arduino Uno through a voltage divider (optional for level shifting)
- RXD: Connected to TX Pin (Digital Pin 1) of Arduino Uno
Relay Modules (each relay):
- VCC: Connected to 5V Pin of Arduino Uno (for powering the relay module)
- GND: Connected to GND Pin of Arduino Uno
- IN1 (or Signal Pin): Connected to Digital Pin 3 (for Relay 1) and Digital Pin 4 (for Relay 2) of Arduino Uno
Bulb with Holder:
- One terminal of the bulb holder is connected to the Common (COM) terminal of the relay module.
- The other terminal of the bulb holder connected to the Normally Open (NO) terminal of the relay module
Fan:
- One terminal of the Fan is connected to the Common (COM) terminal of the relay module.
- The other terminal of the Fan connected to the Normally Open (NO) terminal of the relay module
App Link for Controlling through Mobile:- https://play.google.com/store/apps/details?id=com.broxcode.arduinobluetoothfree&hl=en
After installing the app follow the steps below:
Step 1: Turn ON Bluetooth of the device and pair HC-05. Enter the pairing pin – 1234
Step 2: After successfully paired, open the app and click on this button.
Step 3 : Click on HC-05.
Step 4 : After Successfully connected to HC-05, Click on this button and Send voice command.
Step 5: For Turning on the air purifier, say “Turn ON” and for turning off say “Turn OFF”.
Step 6: Similarly, for turning ON fan, say “Fan ON”.
Circuit Diagram:
Code:
char val;

#define relay1 3
#define relay2 4

void setup() {

  pinMode(relay1, OUTPUT);
  pinMode(relay2, OUTPUT);
  Serial.begin(9600);
  digitalWrite(relay1, LOW);
  digitalWrite(relay2, LOW);
}

void loop() {

  if (Serial.available()) {
    val = Serial.read();
    Serial.println(val);
  }
  if (val == 'Light ON') {
    digitalWrite(relay2, HIGH);
  }

  if (val == 'Fan ON') {
    digitalWrite(relay2, HIGH);
  }
  if (val == 'Turn ON') {
    digitalWrite(relay2, HIGH);
    digitalWrite(relay2, HIGH);
  }
  if (val == 'Turn OFF') {
    digitalWrite(relay1, LOW);
    digitalWrite(relay2, LOW);
  }

  delay(100);

}


