Innovative Water Solutions system works by constantly checking soil moisture levels with sensors in the ground. These sensors send real-time data to an Arduino microcontroller, which decides if the soil is too wet. If it is, the Arduino triggers a relay module to turn on a water pump. The pump then removes the extra water, preventing waterlogging. The water is collected in a storage system to be used later for irrigation or other needs. This project greatly benefits farmers and communities dealing with water issues. By stopping waterlogging, it improves plant health and crop yields. Saving and reusing water helps keep groundwater levels stable, ensuring a steady water supply. The system can be easily adapted for different agricultural and urban environments, making it a flexible solution for water management around the world. Through automation and smart use of resources, Innovative Water Solutions project supports sustainable farming practices and water conservation efforts.
Component Required :
- Arduino UNO
- Soil Moisture Sensor
- Mini Water Pump
- Relay Module
- Jumper Wires
- Power Supply
Component Descriptions:
- Arduino UNO: Microcontroller board based on the ATmega328P, used to read sensor data, control the water pump via relay.
- Soil Moisture Sensor: Measures the moisture level in the soil and provides analog output to the Arduino, enabling it to determine when irrigation is needed.
- Mini Water Pump: Small pump used for dispensing water and fertilizer to plants based on commands from the Arduino, typically powered by a separate power supply.
- Relay Module: Electrical switch controlled by the Arduino to turn the water pump on and off, capable of handling higher voltages and currents than the Arduino itself.
- Jumper Wires: Wires used to establish connections between components on a breadboard or circuit, facilitating data and power transmission.
- Power Supply: Provides stable voltage and current to the Arduino, soil moisture sensor, relay module, and other components in the system to ensure reliable operation.
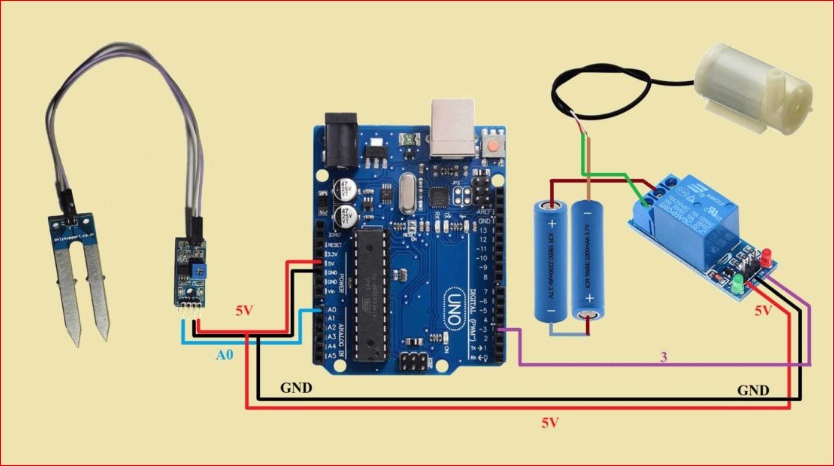
Circuit Connection Steps:
- Connect the Soil Moisture Sensor:
- Connect the VCC pin of the soil moisture sensor to the 5V output of the Arduino.
- Connect the GND pin of the soil moisture sensor to the GND of the Arduino.
- Connect the AO pin (Analog Output) of the soil moisture sensor to analog pin A0 on the Arduino.
- Connect the Relay Module:
- Identify the control pins on the relay module .
- Connect the VCC or JD-VCC pin of the relay module to the 5V output of the Arduino.
- Connect the GND pin of the relay module to the GND of the Arduino.
- Connect the control pin (typically marked IN) of the relay module to digital pin 3 on the Arduino.
- Power the Components:
- Ensure the Arduino and components (soil moisture sensor and relay module) are powered by a 5v supply.
- Optionally, if using a water pump, connect its power supply to an appropriate power source (typically 12V) and ensure to connect the pump ground to the Arduino ground to share a common ground.
- Upload and Run the Code:
- Upload the provided Arduino code to the Arduino UNO using the Arduino IDE.
// Define the analog pin for soil moisture sensor and the digital pin for relay
int soil = A0; // Analog pin for soil moisture sensor
int relay = 3; // Digital pin for relay control

void setup() {
  pinMode(soil, INPUT);   // Set soil moisture sensor pin as input
  pinMode(relay, OUTPUT); // Set relay pin as output
  digitalWrite(relay, HIGH); // Initialize relay to off state
  Serial.begin(9600);     // Initialize serial communication for debugging
}

void loop() {
  int soilData = analogRead(soil); // Read analog input from soil moisture sensor
  Serial.print("Soil Moisture: ");
  Serial.println(soilData); // Print soil moisture value to serial monitor

  // Check soil moisture level
  if (soilData > 900) {
    digitalWrite(relay, LOW); // If soil is too dry, turn on relay (activate irrigation)
  } else {
    digitalWrite(relay, HIGH); // If soil is moist enough, turn off relay (stop irrigation)
  }

  delay(1000); // Delay to stabilize readings and avoid rapid switching
}


