The Smart Height-O-Meter project is an innovative system designed to measure height automatically using an Arduino microcontroller, an ultrasonic sensor, an LCD display, and a battery for portable operation. This device aims to provide an easy-to-use, accurate, and portable solution for height measurement without the need for manual tools.
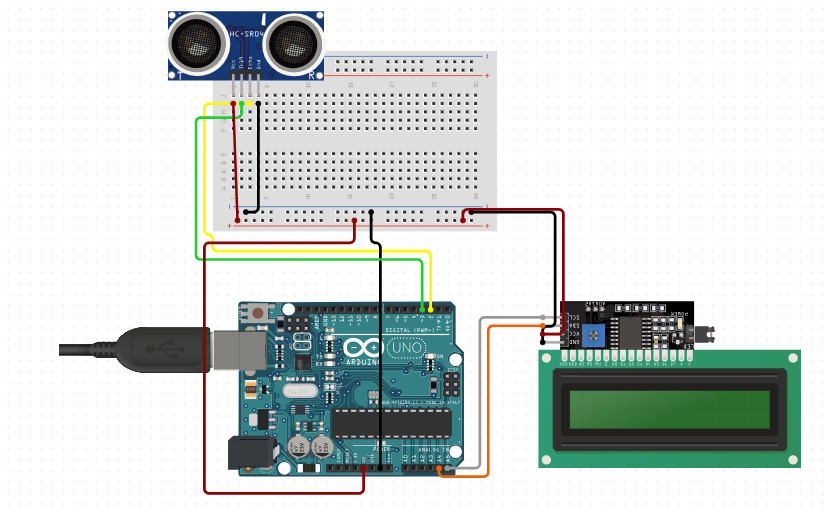
The core component of the system is the Arduino board, which acts as the brain of the project. It interfaces with an ultrasonic sensor, typically an HC-SR04, which measures the distance from the sensor to the top of the subject’s head. The sensor emits ultrasonic waves and calculates the time it takes for the echo to return, thereby determining the distance. This distance data is then processed by the Arduino to calculate the height by subtracting it from a fixed reference point, such as the ceiling height.
The calculated height is displayed on a 16×2 LCD screen, which is connected to the Arduino. The LCD provides a clear and immediate readout of the measurement, making it user-friendly. The entire system is powered by a rechargeable battery, ensuring portability and convenience.
This project integrates various components seamlessly to deliver an efficient and automated height measurement solution. It is ideal for use in schools, clinics, and fitness centers, where accurate and quick height measurement is essential. The Smart Height-O-Meter exemplifies the practical application of microcontroller programming and sensor integration in real-world scenarios.
COMPONENTS LIST-
1. ULTRASONIC SENSOR
2.ARDUINO UNO
3.I2C LCD
4. BATTERY
5. JUMPER WIRES- MM(8), MF(4)
// Include Libraries

#include "Arduino.h"

#include "NewPing.h"

#include "LiquidCrystal_PCF8574.h"


// Pin Definitions

#define HCSR04_PIN_TRIG	3

#define HCSR04_PIN_ECHO	2


// Global variables and defines

// There are several different versions of the LCD I2C adapter, each might have a different address.

// Try the given addresses by Un/commenting the following rows until LCD works follow the serial monitor prints.

// To find your LCD address go to: http://playground.arduino.cc/Main/I2cScanner and run example.

#define LCD_ADDRESS 0x3F

//#define LCD_ADDRESS 0x27

// Define LCD characteristics

#define LCD_ROWS 2

#define LCD_COLUMNS 16

#define SCROLL_DELAY 150

#define BACKLIGHT 255

// object initialization

NewPing hcsr04(HCSR04_PIN_TRIG,HCSR04_PIN_ECHO);

LiquidCrystal_PCF8574 lcdI2C;


// define vars for testing menu

const int timeout = 10000;       //define timeout of 10 sec

char menuOption = 0;

long time0;


// Setup the essentials for your circuit to work. It runs first every time your circuit is powered with electricity.

void setup()

{

    // Setup Serial which is useful for debugging

    // Use the Serial Monitor to view printed messages

    Serial.begin(9600);

    while (!Serial) ; // wait for serial port to connect. Needed for native USB

    Serial.println("start");


    // initialize the lcd

    lcdI2C.begin(LCD_COLUMNS, LCD_ROWS, LCD_ADDRESS, BACKLIGHT);

    menuOption = menu();


}


// Main logic of your circuit. It defines the interaction between the components you selected. After setup, it runs over and over again, in an eternal loop.

void loop()

{


    if(menuOption == '1') {

    // Ultrasonic Sensor - HC-SR04 - Test Code

    // Read distance measurment from UltraSonic sensor

    int hcsr04Dist = hcsr04.ping_cm();

    delay(10);

    Serial.print(F("Distance: ")); Serial.print(hcsr04Dist); Serial.println(F("[cm]"));


    }

    else if(menuOption == '2') {

    // LCD 16x2 I2C - Test Code

    // The LCD Screen will display the text of your choice.

    lcdI2C.clear();                          // Clear LCD screen.

    lcdI2C.print("  Circuito.io  ");                   // Print print String to LCD on first line

    lcdI2C.selectLine(2);                    // Set cursor at the begining of line 2

    lcdI2C.print("     Rocks!  ");                   // Print print String to LCD on second line

    delay(1000);


    }


    if (millis() - time0 > timeout)

    {

        menuOption = menu();

    }


}


// Menu function for selecting the components to be tested

// Follow serial monitor for instrcutions

char menu()

{


    Serial.println(F("\nWhich component would you like to test?"));

    Serial.println(F("(1) Ultrasonic Sensor - HC-SR04"));

    Serial.println(F("(2) LCD 16x2 I2C"));

    Serial.println(F("(menu) send anything else or press on board reset button\n"));

    while (!Serial.available());


    // Read data from serial monitor if received

    while (Serial.available())

    {

        char c = Serial.read();

        if (isAlphaNumeric(c))

        {


            if(c == '1')

    			Serial.println(F("Now Testing Ultrasonic Sensor - HC-SR04"));

    		else if(c == '2')

    			Serial.println(F("Now Testing LCD 16x2 I2C"));

            else

            {

                Serial.println(F("illegal input!"));

                return 0;

            }

            time0 = millis();

            return c;

        }

    }

} 


