Project Description
This project involves designing a secure door lock system utilizing an Arduino Uno board. The system comprises a 4×4 keypad matrix, a servo motor, a touch sensor, and a 16×2 LCD I2C display. To gain access, you need to enter the correct password via the keypad. If the password is valid, the servo motor rotates, unlocking the door, and the LCD shows “Access Granted.” Conversely, if the password is incorrect, the LCD “Access Denied,” and the door remains locked. The touch sensor is used to relock the door. Additionally, you can modify the password by pressing the ‘#’ button on the keypad.
Components Required:
- Arduino Uno with cable
- 4×4 Keypad
- 16×2 LCD I2C Display
- Servo Motor SG90s
- Touch Sensor TTP223B
- Jumper Wires – Male to Female x 18
Learning Outcomes
- Integration: Learn to integrate various components such as a keypad, servo motor, and touch sensor with Arduino.
- Security: Understand the basics of creating a secure password-protected system.
- Programming: Gain experience in handling user input and controlling hardware through code.
- DIY Projects: Encourage creativity and problem-solving by building a practical and functional door lock system.
IMAGE:

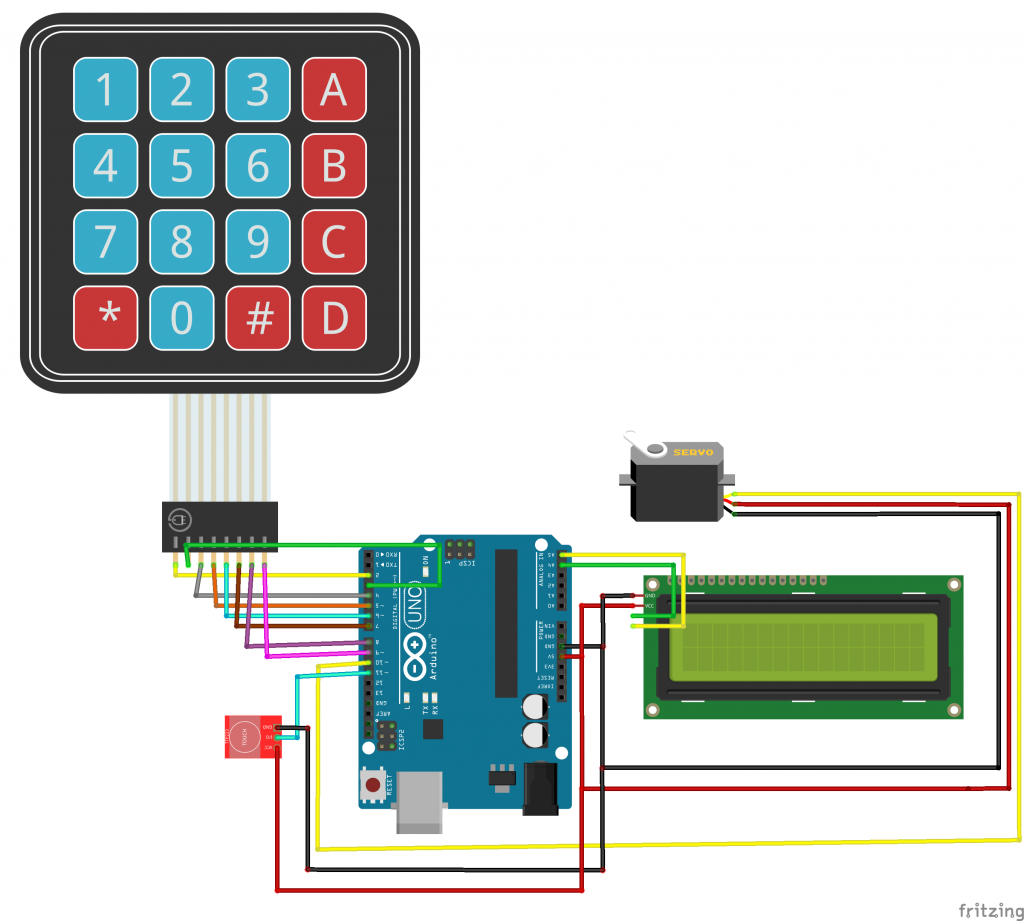
Connections:
- Keypad Connections:
- Connect the 8 pins of the keypad to digital pins 2 through 9 on the Arduino.
- LCD I2C Display Connections:
- Connect SDA to A4 on the Arduino.
- Connect SCL to A5 on the Arduino.
- Connect VCC to 5V on the Arduino.
- Connect GND to GND on the Arduino.
- Servo Motor Connections:
- Connect the control wire of the servo to digital pin 10 on the Arduino.
- Connect the power and ground wires of the servo to 5V and GND on the Arduino.
- Touch Sensor Connections:
- Connect the output of the touch sensor to digital pin 11 on the Arduino.
- Connect the power and ground wires of the touch sensor to 5V and GND on the Arduino.
CIRCUIT DIAGRAM:
NOTE: Before uploading and running the code IN ARDUINO IDE:
Go to > Sketch > Include Library > Manage Libraries… > Type the library name
OR Go to > Sketch > Include Library > Add .ZIP Library… download the zip library from the given link below.
LiquidCrystal library – https://github.com/fdebrabander/Arduino-LiquidCrystal-I2C-library
Keypad library – https://github.com/Chris–A/Keypad
CODE:
#include <Wire.h>
#include <LiquidCrystal_I2C.h>
#include <Servo.h>
#include <Keypad.h>

LiquidCrystal_I2C lcd(0x27, 16, 2);
Servo myServo;

const byte ROWS = 4;
const byte COLS = 4;

char keys[ROWS][COLS] = {
  { '1', '2', '3', 'A' },
  { '4', '5', '6', 'B' },
  { '7', '8', '9', 'C' },
  { '*', '0', '#', 'D' }
};

byte rowPins[ROWS] = { 9, 8, 7, 6 };
byte colPins[COLS] = { 5, 4, 3, 2 };

Keypad keypad = Keypad(makeKeymap(keys), rowPins, colPins, ROWS, COLS);

const int servoPin = 10;
const int touchSensorPin = 11;

String password = "1234";  // Default password
String inputPassword;
bool changePasswordMode = false;
String newPassword;

void setup() {
  lcd.init();
  lcd.backlight();
  myServo.attach(servoPin);
  pinMode(touchSensorPin, INPUT);
  myServo.write(0);  // Lock position
  lcd.print("Enter Password:");
}

void loop() {
  char key = keypad.getKey();
  if (key) {
    if (key == '#') {
      if (!changePasswordMode) {
        changePasswordMode = true;
        lcd.clear();
        lcd.print("Old Password:");
        inputPassword = "";
      } else {
        if (inputPassword == password) {
          lcd.clear();
          lcd.print("New Password:");
          newPassword = "";
        } else {
          lcd.clear();
          lcd.print("Wrong Password");
          delay(2000);
          lcd.clear();
          lcd.print("Enter Password:");
          changePasswordMode = false;
        }
      }
    } else if (key == '*' && changePasswordMode) {
      if (newPassword.length() >= 4) {
        password = newPassword;
        lcd.clear();
        lcd.print("Password Changed");
        delay(2000);
        lcd.clear();
        lcd.print("Enter Password:");
        changePasswordMode = false;
      } else {
        lcd.clear();
        lcd.print("Too Short");
        delay(2000);
        lcd.clear();
        lcd.print("New Password:");
      }
    } else {
      inputPassword += key;
      lcd.setCursor(inputPassword.length() - 1, 1);
      lcd.print('*');
      if (inputPassword.length() == password.length()) {
        if (inputPassword == password) {
          lcd.clear();
          lcd.print("Access Granted");
          myServo.write(90);  // Unlock position
          delay(5000);        // Keep the door unlocked for 5 seconds
          lcd.clear();
          lcd.print("Enter Password:");
        } else {
          lcd.clear();
          lcd.print("Access Denied");
          delay(2000);
          lcd.clear();
          lcd.print("Enter Password:");
        }
        inputPassword = "";
      }
    }
  }

  if (digitalRead(touchSensorPin) == HIGH) {
    myServo.write(0);  // Lock position
    lcd.clear();
    lcd.print("Door Locked");
    delay(2000);
    lcd.clear();
    lcd.print("Enter Password:");
  }
}


