The Color Sorting Machine project is an innovative and educational automation system that uses a color sensor and four servo motors to sort objects based on their color. This project demonstrates how to integrate sensors and actuators with a microcontroller to perform a specific task efficiently and accurately.
Components List:
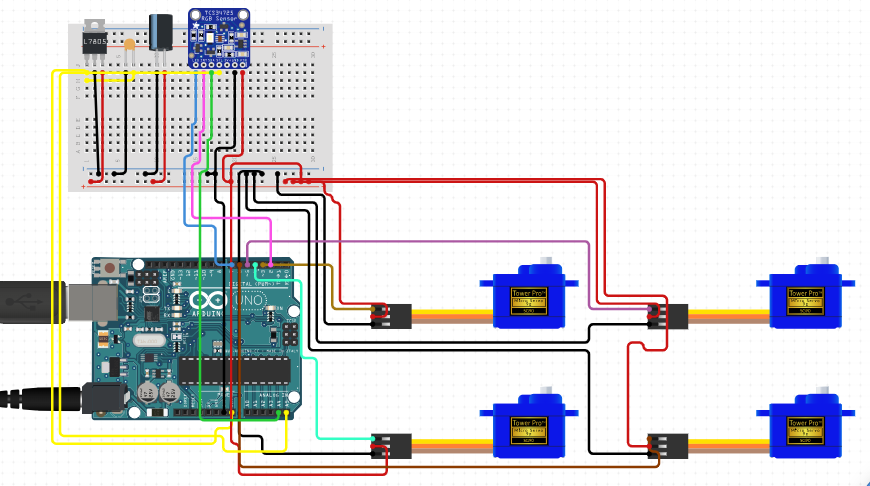
- Arduino Uno (1): The microcontroller that serves as the brain of the system, processing data from the color sensor and controlling the servo motors.
- Color Sensor (e.g., TCS3200) (1): Detects the color of the objects and sends the information to the Arduino for processing.
- Servo Motors (4): Actuators that position the sorting mechanism to direct objects into the correct bins based on their color.
- Conveyor Belt (1): Transports the objects to the color sensor and sorting mechanism.
- Power Supply (1): Provides necessary power to the Arduino and servo motors.
- Breadboard and Connecting Wires: For prototyping and connecting components.
- Jumper Wires:
- Male-to-Male (10): For direct connections between components.
- Male-to-Female (10): For connecting components to the breadboard or Arduino.
- Female-to-Female (10): For specific connections as needed.
- Mounting Hardware: To securely attach the color sensor and servo motors.
Description:
The Color Sorting Machine works by transporting objects on a conveyor belt to a position where the color sensor can detect them. The Arduino processes the color data and determines which color bin the object belongs to. It then activates one of the four servo motors, each corresponding to a different color bin, to move a sorting mechanism that directs the object into the correct bin. This system is designed to sort objects into four categories based on color, providing a clear demonstration of automated sorting technology.
Applications:
- Recycling: Automates the sorting of recyclable materials based on color, improving efficiency in recycling plants.
- Manufacturing: Ensures quality control by sorting products based on color, enhancing consistency and reducing errors.
- Agriculture: Sorts fruits or vegetables by color, ensuring uniformity in packaging and improving market value.
- Educational Tools: Serves as a practical project for teaching students about sensors, actuators, and microcontroller programming.
The Color Sorting Machine project not only provides a hands-on learning experience but also illustrates the practical applications of automation and robotics in various industries. It showcases the potential for improving efficiency and accuracy in sorting processes, making it an invaluable tool in both educational and industrial settings.
// Include Libraries
#include "Arduino.h"
#include "Servo.h"


// Pin Definitions
#define SERVO9G1_1_PIN_SIG  3
#define SERVO9G2_2_PIN_SIG  4
#define SERVO9G3_3_PIN_SIG  5
#define SERVO9G4_4_PIN_SIG  6
#define TCS34725_PIN_LED  7
#define TCS34725_PIN_INT  2


// Global variables and defines
const int servo9g1_1RestPosition   = 20;  //Starting position
const int servo9g1_1TargetPosition = 150; //Position when event is detected
const int servo9g2_2RestPosition   = 20;  //Starting position
const int servo9g2_2TargetPosition = 150; //Position when event is detected
const int servo9g3_3RestPosition   = 20;  //Starting position
const int servo9g3_3TargetPosition = 150; //Position when event is detected
const int servo9g4_4RestPosition   = 20;  //Starting position
const int servo9g4_4TargetPosition = 150; //Position when event is detected
// object initialization
Servo servo9g1_1;
Servo servo9g2_2;
Servo servo9g3_3;
Servo servo9g4_4;


// define vars for testing menu
const int timeout = 10000;       //define timeout of 10 sec
char menuOption = 0;
long time0;

// Setup the essentials for your circuit to work. It runs first every time your circuit is powered with electricity.
void setup()
{
    // Setup Serial which is useful for debugging
    // Use the Serial Monitor to view printed messages
    Serial.begin(9600);
    while (!Serial) ; // wait for serial port to connect. Needed for native USB
    Serial.println("start");

    servo9g1_1.attach(SERVO9G1_1_PIN_SIG);
    servo9g1_1.write(servo9g1_1RestPosition);
    delay(100);
    servo9g1_1.detach();
    servo9g2_2.attach(SERVO9G2_2_PIN_SIG);
    servo9g2_2.write(servo9g2_2RestPosition);
    delay(100);
    servo9g2_2.detach();
    servo9g3_3.attach(SERVO9G3_3_PIN_SIG);
    servo9g3_3.write(servo9g3_3RestPosition);
    delay(100);
    servo9g3_3.detach();
    servo9g4_4.attach(SERVO9G4_4_PIN_SIG);
    servo9g4_4.write(servo9g4_4RestPosition);
    delay(100);
    servo9g4_4.detach();
    menuOption = menu();

}

// Main logic of your circuit. It defines the interaction between the components you selected. After setup, it runs over and over again, in an eternal loop.
void loop()
{


    if(menuOption == '1') {
    // 9G Micro Servo #1 - Test Code
    // The servo will rotate to target position and back to resting position with an interval of 500 milliseconds (0.5 seconds)
    servo9g1_1.attach(SERVO9G1_1_PIN_SIG);         // 1. attach the servo to correct pin to control it.
    servo9g1_1.write(servo9g1_1TargetPosition);  // 2. turns servo to target position. Modify target position by modifying the 'ServoTargetPosition' definition above.
    delay(500);                              // 3. waits 500 milliseconds (0.5 sec). change the value in the brackets (500) for a longer or shorter delay in milliseconds.
    servo9g1_1.write(servo9g1_1RestPosition);    // 4. turns servo back to rest position. Modify initial position by modifying the 'ServoRestPosition' definition above.
    delay(500);                              // 5. waits 500 milliseconds (0.5 sec). change the value in the brackets (500) for a longer or shorter delay in milliseconds.
    servo9g1_1.detach();                    // 6. release the servo to conserve power. When detached the servo will NOT hold it's position under stress.
    }
    else if(menuOption == '2') {
    // 9G Micro Servo #2 - Test Code
    // The servo will rotate to target position and back to resting position with an interval of 500 milliseconds (0.5 seconds)
    servo9g2_2.attach(SERVO9G2_2_PIN_SIG);         // 1. attach the servo to correct pin to control it.
    servo9g2_2.write(servo9g2_2TargetPosition);  // 2. turns servo to target position. Modify target position by modifying the 'ServoTargetPosition' definition above.
    delay(500);                              // 3. waits 500 milliseconds (0.5 sec). change the value in the brackets (500) for a longer or shorter delay in milliseconds.
    servo9g2_2.write(servo9g2_2RestPosition);    // 4. turns servo back to rest position. Modify initial position by modifying the 'ServoRestPosition' definition above.
    delay(500);                              // 5. waits 500 milliseconds (0.5 sec). change the value in the brackets (500) for a longer or shorter delay in milliseconds.
    servo9g2_2.detach();                    // 6. release the servo to conserve power. When detached the servo will NOT hold it's position under stress.
    }
    else if(menuOption == '3') {
    // 9G Micro Servo #3 - Test Code
    // The servo will rotate to target position and back to resting position with an interval of 500 milliseconds (0.5 seconds)
    servo9g3_3.attach(SERVO9G3_3_PIN_SIG);         // 1. attach the servo to correct pin to control it.
    servo9g3_3.write(servo9g3_3TargetPosition);  // 2. turns servo to target position. Modify target position by modifying the 'ServoTargetPosition' definition above.
    delay(500);                              // 3. waits 500 milliseconds (0.5 sec). change the value in the brackets (500) for a longer or shorter delay in milliseconds.
    servo9g3_3.write(servo9g3_3RestPosition);    // 4. turns servo back to rest position. Modify initial position by modifying the 'ServoRestPosition' definition above.
    delay(500);                              // 5. waits 500 milliseconds (0.5 sec). change the value in the brackets (500) for a longer or shorter delay in milliseconds.
    servo9g3_3.detach();                    // 6. release the servo to conserve power. When detached the servo will NOT hold it's position under stress.
    }
    else if(menuOption == '4') {
    // 9G Micro Servo #4 - Test Code
    // The servo will rotate to target position and back to resting position with an interval of 500 milliseconds (0.5 seconds)
    servo9g4_4.attach(SERVO9G4_4_PIN_SIG);         // 1. attach the servo to correct pin to control it.
    servo9g4_4.write(servo9g4_4TargetPosition);  // 2. turns servo to target position. Modify target position by modifying the 'ServoTargetPosition' definition above.
    delay(500);                              // 3. waits 500 milliseconds (0.5 sec). change the value in the brackets (500) for a longer or shorter delay in milliseconds.
    servo9g4_4.write(servo9g4_4RestPosition);    // 4. turns servo back to rest position. Modify initial position by modifying the 'ServoRestPosition' definition above.
    delay(500);                              // 5. waits 500 milliseconds (0.5 sec). change the value in the brackets (500) for a longer or shorter delay in milliseconds.
    servo9g4_4.detach();                    // 6. release the servo to conserve power. When detached the servo will NOT hold it's position under stress.
    }
    else if(menuOption == '5')
    {
    // Disclaimer: The RGB Color Sensor with IR filter and White LED - TCS34725 is in testing and/or doesn't have code, therefore it may be buggy. Please be kind and report any bugs you may find.
    }

    if (millis() - time0 > timeout)
    {
        menuOption = menu();
    }

}


// Menu function for selecting the components to be tested
// Follow serial monitor for instrcutions
char menu()
{

    Serial.println(F("\nWhich component would you like to test?"));
    Serial.println(F("(1) 9G Micro Servo #1"));
    Serial.println(F("(2) 9G Micro Servo #2"));
    Serial.println(F("(3) 9G Micro Servo #3"));
    Serial.println(F("(4) 9G Micro Servo #4"));
    Serial.println(F("(5) RGB Color Sensor with IR filter and White LED - TCS34725"));
    Serial.println(F("(menu) send anything else or press on board reset button\n"));
    while (!Serial.available());

    // Read data from serial monitor if received
    while (Serial.available())
    {
        char c = Serial.read();
        if (isAlphaNumeric(c))
        {

            if(c == '1')
          Serial.println(F("Now Testing 9G Micro Servo #1"));
        else if(c == '2')
          Serial.println(F("Now Testing 9G Micro Servo #2"));
        else if(c == '3')
          Serial.println(F("Now Testing 9G Micro Servo #3"));
        else if(c == '4')
          Serial.println(F("Now Testing 9G Micro Servo #4"));
        else if(c == '5')
          Serial.println(F("Now Testing RGB Color Sensor with IR filter and White LED - TCS34725 - note that this component doesn't have a test code"));
            else
            {
                Serial.println(F("illegal input!"));
                return 0;
            }
            time0 = millis();
            return c;
        }
    }
}


