Project Description
RWAVVE (RADIO WAVE AIDED AUDIO and VIDEO EDUCATION ) This project involves creating a wireless communication system using Arduino and radio wave modules. The system consists of a transmitter and a receiver, enabling data transmission over radio waves. This system does not use wifi or any other broadband services to transmit the data. Such a system can be used in various applications like remote control, wireless sensors, and data logging.
Components Required:
- Arduino uno board with cable x 2
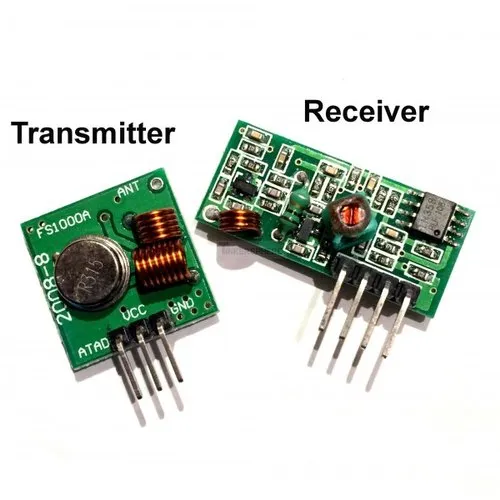
- RF Transmitter and Receiver 433 Mhz x 1
- Jumper wires – Male to Female x 6
Working Principle:
- Transmitter: The transmitter Arduino continuously sends a predefined signal via the RF transmitter module.
- Receiver: The receiver Arduino listens for incoming signals using the RF receiver module and displays on the serial monitor
Conclusion:
This project demonstrates a basic wireless communication system using radio waves with Arduino. By using RF modules for transmitting and receiving data, users can implement various wireless applications. The system continuously sends a predefined message from the transmitter, upon receiving the signal it will be displayed on the serial monitor making it easy to understand and test the functionality of the wireless communication system.
Connections:
Connection of first Arduino with RF Transmitter:
- Arduino pin 5v to VCC of transmitter
- Arduino pin GND to GND transmitter
- Arduino pin 12 to data transmitter
Connection of second Arduino to RF Receiver:
- Arduino pin 5v to VCC of receiver
- Arduino pin GND to GND of receiver
- Arduino pin 11 to the data pin of the receiver
Images:
Circuit diagram:
RF transmitter:
RF receiver:

NOTE:
Before uploading and running the code IN ARDUINO IDE:
Go to > Sketch > Include Library > Manage Libraries… > Type the library name
OR Go to > Sketch > Include Library > Add .ZIP Library… download the zip library from the link given below.
1. RH_ASK – https://github.com/Haven-Lau/Arduino-Libraries/blob/master/RadioHead/RH_ASK.h
CODE Transmitter:
#include <RH_ASK.h>
#include <SPI.h>


RH_ASK rf_driver;

void setup() {
  rf_driver.init();
}

void loop() {
  const char *msg = "Hello World";
  rf_driver.send((uint8_t *)msg, strlen(msg));
  rf_driver.waitPacketSent();
  delay(1000);
}
CODE Recevier:
#include <RH_ASK.h>
#include <SPI.h>

RH_ASK rf_driver;

void setup() {
  rf_driver.init();
  Serial.begin(9600);
}

void loop() {
  // Set buffer to size of expected message
  uint8_t buf[11];
  uint8_t buflen = sizeof(buf);
  // Check if received packet is correct size
  if (rf_driver.recv(buf, &buflen)) {

    // Message received with valid checksum
    Serial.print("Message Received: ");
    Serial.println((char*)buf);
  }
}


