Description:
This project aims to address the issue of water storage on roads, which often leads to overflow and blockages in drainage systems. By using a water level sensor and a servo motor, the system can automatically control the drainage process, ensuring efficient water management.
The water level sensor is placed in the drainage area to monitor the water level continuously. It sends real-time data to the Arduino, which processes this information. When the water level reaches a predefined threshold, the Arduino activates the servo motor. The servo motor is connected to a valve that controls the flow of water into the drainage system.
If the water level is too high, the servo motor will open the valve to allow more water to flow out, preventing overflow. Conversely, if the water level is low, the servo motor will close the valve, ensuring that the drainage system does not dry out and maintain an optimal water flow. This automated control helps in managing water storage on roads more effectively, reducing the risk of flooding and blockages that can cause significant problems in urban areas.
The components used in this project are simple and cost-effective, making it accessible for widespread implementation. The Arduino serves as the brain of the system, processing input from the water level sensor and controlling the servo motor based on the programmed thresholds. The relay module acts as an intermediary, switching the valve based on signals from the Arduino.
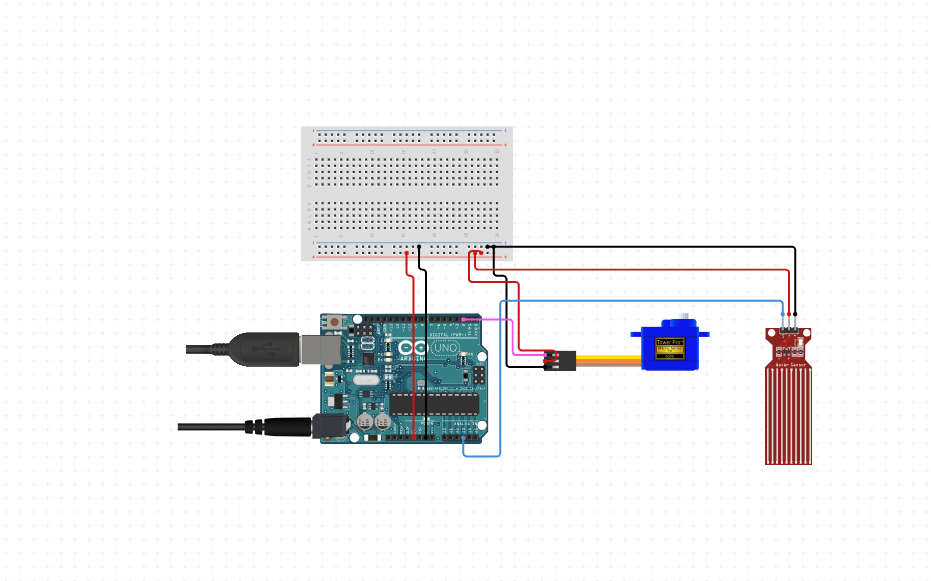
Components Needed:
- Arduino Uno X1
- Water Level Sensor (analog output, connected to A3) X1
- Servo Motor (signal pin connected to pin 2) X1
- Breadboard X1
- Jumper Wires [Male to Male (X5), Male to Female (X3)]
Circuit Connections:
- Water Level Sensor:
- VCC to Arduino 5V
- GND to Arduino GND
- Analog output to Arduino A3
- Servo Motor:
- VCC to Arduino 5V
- GND to Arduino GND
- Signal pin to Arduino pin 2
#include <Servo.h>

// Pin definitions
const int waterLevelPin = A3;
const int servoPin = 2;

// Threshold for water level (adjust as needed)
const int waterLevelThreshold = 500;

Servo myServo;

void setup() {
  myServo.attach(servoPin);
  myServo.write(0);  // Ensure the servo is initially in the 0 degree position

  Serial.begin(9600);
}

void loop() {
  int waterLevelValue = analogRead(waterLevelPin);

  Serial.print("Water Level: ");
  Serial.println(waterLevelValue);

  if (waterLevelValue > waterLevelThreshold) {
    // Move the servo to 90 degrees if water level is above the threshold
    myServo.write(90);
    Serial.println("Water level high - Servo moved to 90 degrees");
  } else {
    // Move the servo to 0 degrees if water level is below the threshold
    myServo.write(0);
    Serial.println("Water level low - Servo moved to 0 degrees");
  }

  delay(1000); // Delay before next reading
}