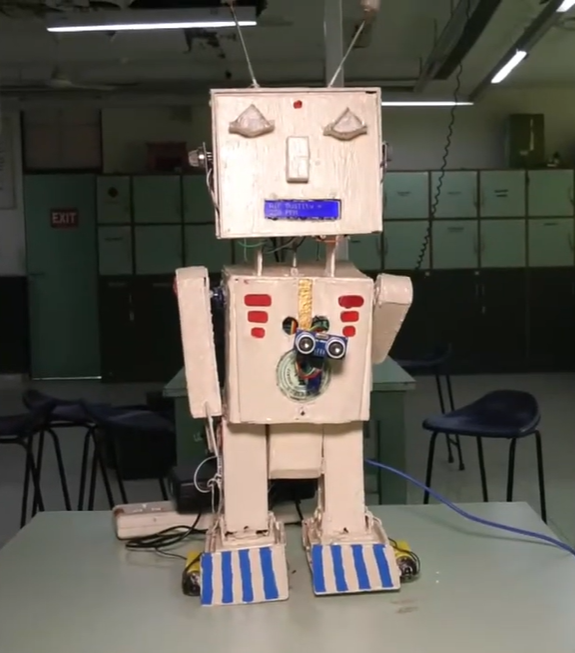
ADBUTH ROBIE is a pioneering robotic project designed to assess the viability of human survival on other planets through advanced sensor technology and autonomous functionality. Key components include the MQ135 and MQ7 gas sensors, which detect crucial atmospheric gases like carbon dioxide, methane, and pollutants, essential for understanding air quality and potential hazards. The ultrasonic sensor enhances navigational capabilities by accurately measuring distances to objects, ensuring safe exploration of planetary terrains. Additionally, a soil moisture sensor evaluates soil fertility and water content, critical for assessing agricultural potential and sustainable resource utilization.
Components used in this project are:
- Arduino UNO with cable
- MQ135 Air quality sensor
- MQ7 Carbon Monoxide sensor
- Ultrasonic sensor HC-SR04
- Soil moisture sensor
- LED
- Full-Size Breadboard
- Male to Male Jumper wires x 30
Advantages of ADBUTH ROBIE include:
1. Comprehensive Environmental Assessment: This means using many sensors to study the environment thoroughly. The sensors help us learn about what gases are in the air, how healthy the soil is, and where there might be water on faraway planets.
2. Autonomous Operation: It can do its work by itself. It’s like a robot that can think and act on its own because it’s controlled by a special computer called an Arduino. This helps it collect information and analyze data without needing people to tell it what to do all the time. This way, it makes space missions safer and costs less money.
Disadvantages of ADBUTH ROBIE include:
1. Complexity and Maintenance: When you have many different sensors and control systems working together, it makes the design and upkeep (maintenance) of the robot more difficult. It means you need people who are experts in these areas and special tools to keep everything working well.
2. Limited Adaptability: It is good at studying certain things in the environment, like air quality and soil conditions. However, it might find it hard to handle unexpected changes or different types of land on new planets. This could make it less able to change its plans quickly or explore different places easily.
Featured Image:
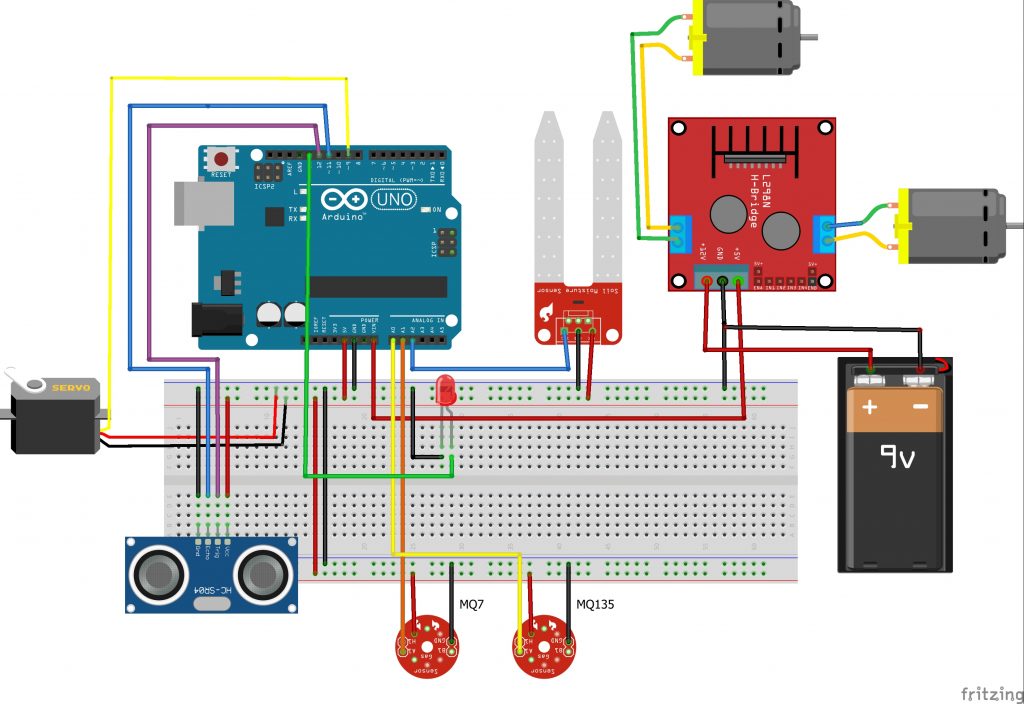
Pin Connection:
Ultrasonic Sensor (HC-SR04):
- VCC: Connected to Arduino 5V pin.
- GND: Connected to Arduino GND pin.
- Trig: Connect to digital pin 12
- Echo: Connect to digital pin 11
MQ135 Gas Sensor:
- VCC: Connected to Arduino 5V pin.
- GND: Connected to Arduino GND pin.
- AOUT: Analog output, connect to an analog pin A0
MQ7 Gas Sensor:
- VCC: Connected to Arduino 5V pin.
- GND: Connected to Arduino GND pin.
- AOUT: Analog output, connect to an analog pin A1
LED:
- Anode (longer leg): Connect to a current-limiting resistor 220 ohms and then to a digital pin 13
- Cathode (shorter leg): Connect directly to Arduino GND.
Soil Moisture Sensor (FC-28):
- VCC: Connected to Arduino 5V pin.
- GND: Connected to Arduino GND pin.
- A0: Analog output, connect to an analog pin A2
Servo Motor:
- VCC (typically red): Connected to Arduino 5V pin.
- GND (typically brown or black): Connected to Arduino GND pin.
- Control Signal (typically yellow or orange): Connects to a Digital pin 9
Motor Driver (L298N):
- IN1 (Motor A Input 1): Connect to Arduino digital pin 2
- IN2 (Motor A Input 2): Connect to Arduino digital pin 3
- IN3 (Motor B Input 1): Connect to Arduino digital pin 4
- IN4 (Motor B Input 2): Connect to Arduino digital pin 5
- VCC: Connected to Arduino 5V pin.
- GND: Connected to Arduino GND pin.
- Motor Power: Connected to an external power supply suitable for your motors (e.g., 9V or 12V).
Circuit Diagram:
Code:
// Pin definitions
#define TRIGGER_PIN 12          // Pin connected to ultrasonic sensor's trigger pin
#define ECHO_PIN 11             // Pin connected to ultrasonic sensor's echo pin
#define MQ135_PIN A0            // Analog pin connected to MQ135 gas sensor
#define MQ7_PIN A1              // Analog pin connected to MQ7 gas sensor
#define SOIL_MOISTURE_PIN A2    // Analog pin connected to soil moisture sensor
#define LED_PIN 13              // Pin connected to onboard LED for status indication
#define HAND_SERVO_PIN1 9       // Pin connected to servo 1 for hand movement
#define HAND_SERVO_PIN2 10      // Pin connected to servo 2 for hand movement

// Constants for thresholds
#define CO2_THRESHOLD 1000      // Threshold for CO2 concentration in ppm
#define METHANE_THRESHOLD 50    // Threshold for methane concentration in ppm
#define SOIL_MOISTURE_THRESHOLD 50  // Threshold for soil moisture level
#define DISTANCE_THRESHOLD 50   // Threshold for distance in cm

// Servo and motor control
#include <Servo.h>
Servo handServo1;                // Servo 1 object for hand movement
Servo handServo2;                // Servo 2 object for hand movement
#define MOTOR1_PIN1 2           // Pins for motor 1 (example pins)
#define MOTOR1_PIN2 3
#define MOTOR2_PIN1 4           // Pins for motor 2 (example pins)
#define MOTOR2_PIN2 5

// Ultrasonic sensor object
long duration;
int distance;

//LCD
#include <LiquidCrystal_I2C.h>
LiquidCrystal_I2C lcd(0x27, 16, 2); // set the LCD address for a 16 chars and 2 line display


void setup() {
  Serial.begin(9600);           // Initialize serial communication
  handServo1.attach(HAND_SERVO_PIN1);  // Attach servo to pin for hand movement
  handServo2.attach(HAND_SERVO_PIN2);  // Attach servo to pin for hand movement
  pinMode(TRIGGER_PIN, OUTPUT); // Set trigger pin as output
  pinMode(ECHO_PIN, INPUT);     // Set echo pin as input
  pinMode(MQ135_PIN, INPUT);
  pinMode(MQ7_PIN, INPUT);
  pinMode(SOIL_MOISTURE_PIN, INPUT);
  pinMode(LED_PIN, OUTPUT);     // Set LED pin as output
  handServo1.attach(HAND_SERVO_PIN1);  // Attach servo to pin for hand movement
  handServo2.attach(HAND_SERVO_PIN2);  // Attach servo to pin for hand movement
  handServo1.write(0);
  handServo2.write(0);

  lcd.init();
  lcd.clear();
  lcd.backlight();      // Make sure backlight is on

}

void loop() {
  distance = calculateDistance(); // Calculate distance from ultrasonic sensor in cm
  float co2_ppm = analogRead(MQ135_PIN); // Read CO2 analog signal from MQ135 sensor
  float methane_ppm = analogRead(MQ7_PIN); // Read methane analog signal from MQ7 sensor
  int soil_moisture = analogRead(SOIL_MOISTURE_PIN);  // Read soil moisture level

  // Convert analog readings to actual gas concentrations
  co2_ppm = map(co2_ppm, 0, 1023, 0, 2000);  // Example mapping for CO2 (adjust as per sensor datasheet)
  methane_ppm = map(methane_ppm, 0, 1023, 0, 200);  // Example mapping for methane (adjust as per sensor datasheet)

  // Print sensor readings to serial monitor
  Serial.print("Distance: ");
  Serial.print(distance);
  Serial.println(" cm | CO2: ");
  Serial.println(co2_ppm);
  Serial.println(" ppm | Methane: ");
  Serial.println(methane_ppm);
  Serial.println(" ppm | Soil Moisture: ");
  Serial.println(soil_moisture);
  Serial.println();

  if (soil_moisture < SOIL_MOISTURE_THRESHOLD) {
    digitalWrite(LED_PIN, HIGH);
  }
  else {
    digitalWrite(LED_PIN, LOW);
  }

  //PRINT SENSOR READING TO LCD DISPLAY
  lcd.setCursor(0, 0);
  lcd.print(" cm | CO2: ");
  lcd.print(co2_ppm);

  lcd.setCursor(0, 1);
  lcd.print(" ppm | Methane: ");
  lcd.print(methane_ppm);
  delay(1000);

  if (distance < DISTANCE_THRESHOLD) {
    digitalWrite(MOTOR1_PIN1, HIGH);
    digitalWrite(MOTOR1_PIN2, LOW);
    digitalWrite(MOTOR2_PIN1, HIGH);
    digitalWrite(MOTOR2_PIN2, LOW);
    delay(1000);
    digitalWrite(MOTOR1_PIN1, LOW);
    digitalWrite(MOTOR1_PIN2, LOW);
    digitalWrite(MOTOR2_PIN1, LOW);
    digitalWrite(MOTOR2_PIN2, LOW);
  }
  else {
    handServo1.write(90);  // Example: move servo to 90 degrees (adjust as needed)
    handServo2.write(0);
    delay(1000);          // Example: delay for 1 second
    handServo1.write(0);   // Example: move servo back to 0 degrees
    handServo2.write(90);
  }
  delay(1000);

}

// Function to calculate distance using ultrasonic sensor
long calculateDistance() {
  digitalWrite(TRIGGER_PIN, LOW);
  delayMicroseconds(2);
  digitalWrite(TRIGGER_PIN, HIGH);
  delayMicroseconds(10);
  digitalWrite(TRIGGER_PIN, LOW);
  duration = pulseIn(ECHO_PIN, HIGH);
  return duration * 0.034 / 2;
}


