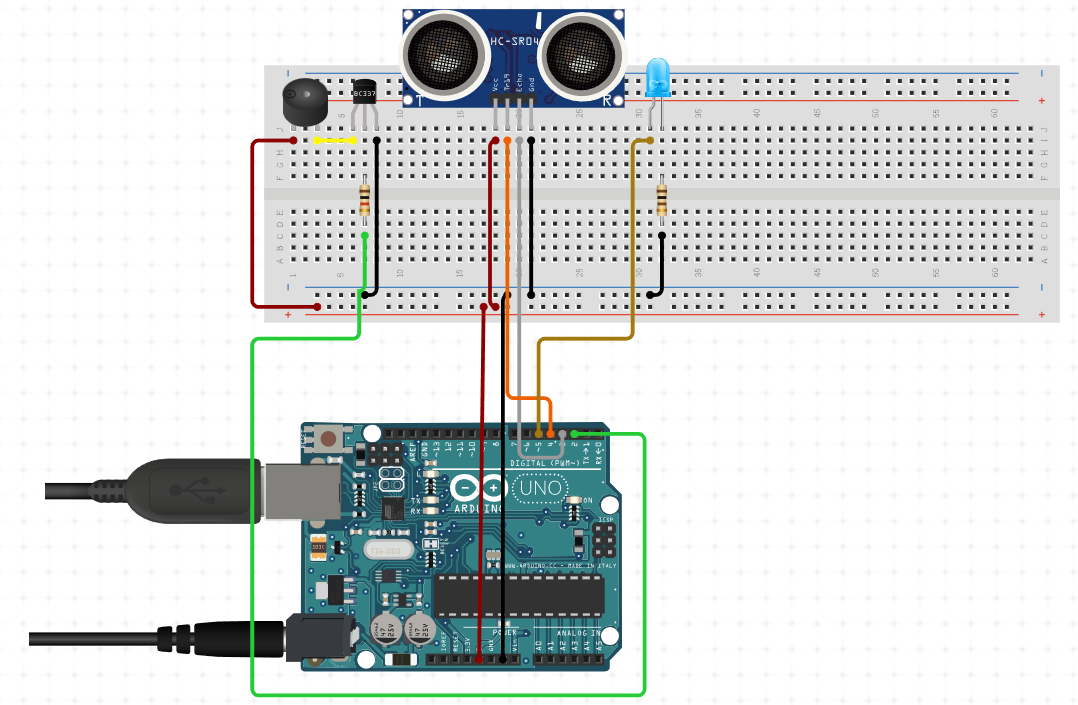
In this project we developed an advanced range detector device using an ultrasonic sensor, Arduino Uno, LED, buzzer, and an NPN transistor to efficiently detect objects and alert users. The core of the system is the HC-SR04 ultrasonic sensor, which measures the distance to objects by emitting ultrasonic waves and timing the echo’s return. This distance data is processed by the Arduino Uno, a versatile microcontroller that serves as the device’s brain.
While detecting an object within a specified range, the Arduino activates an LED and a buzzer to provide visual and audible alerts. The inclusion of an NPN transistor, such as the 2N2222, allows the Arduino to control the buzzer, which may require more current than the Arduino can supply directly. The transistor acts as a switch and enabling the Arduino to turn the buzzer on and off safely.
Components Required:
- Ultrasonic Sensor (HC-SR04) x1: Measures distance by emitting and receiving ultrasonic waves.
- Arduino Uno x1: Microcontroller board to process sensor data and control outputs.
- LED x1: Provides a visual indication when an object is detected.
- Buzzer x1: Emits an audible alert to indicate the presence of an object.
- NPN Transistor (2N2222)x1: Acts as a switch to control the buzzer with the Arduino.
- Resistors x 2: Used for current limiting (e.g., 220 ohms for the LED, 1k ohm for the transistor base).
- Full size Breadboard x1: For assembling the circuit without soldering.
- Jumper Wires (Male to male and male to female): For connecting components on the breadboard.
COMPONENETS OVERVIEW:
The device’s components include the ultrasonic sensor, which connects to the Arduino’s digital pins for trigger and echo signals, and an LED connected through a current-limiting resistor to indicate detection visually. The buzzer is connected to the Arduino through the transistor, with the transistor’s base controlled by a digital output pin, its collector connected to the buzzer, and its emitter grounded.
To build the device, you need an ultrasonic sensor, Arduino Uno, LED, buzzer, NPN transistor, resistors, a breadboard, and jumper wires. The code initializes the sensor and continuously measures the distance, turning on the LED and buzzer when an object is detected within the set range. This range detector is ideal for security systems, obstacle detection, and automated alert systems, providing reliable and efficient object detection and notification.

Pin Connections:
Ultrasonic Sensor (HC-SR04):
- VCC to Arduino 5V
- GND to Arduino GND
- TRIG to Arduino Digital Pin 4
- ECHO to Arduino Digital Pin 3
Buzzer with Transistor:
- Buzzer Positive (long leg) to +5V
- Buzzer Negative (short leg) to Collector (C) of the BC337 transistor
- Emitter (E) of BC337 to GND
- Base (B) of BC337 to one end of 1kΩ resistor
- Other end of 1kΩ resistor to Arduino Digital Pin 2
LED:
- Anode (long leg) to a 220Ω resistor and then to Arduino Digital Pin 5
- Cathode (short leg) to Arduino GND
// Constants for pins
const int triggerPin = 4;   // Arduino pin connected to HC-SR04 trigger pin
const int echoPin = 3;      // Arduino pin connected to HC-SR04 echo pin
const int ledPin = 5;       // Arduino pin connected to LED
const int buzzerPin = 2;    // Arduino pin connected to transistor base

// Variables for distance calculation
long duration;
int distance;

void setup() {
  Serial.begin(9600); // Initialize serial communication for debugging
  pinMode(triggerPin, OUTPUT);
  pinMode(echoPin, INPUT);
  pinMode(ledPin, OUTPUT);
  pinMode(buzzerPin, OUTPUT);
}

void loop() {
  // Clear the trigger pin to ensure a clean pulse
  digitalWrite(triggerPin, LOW);
  delayMicroseconds(2);

  // Send a 10 microsecond pulse to trigger the sensor
  digitalWrite(triggerPin, HIGH);
  delayMicroseconds(10);
  digitalWrite(triggerPin, LOW);

  // Measure the duration of the echo pulse
  duration = pulseIn(echoPin, HIGH);

  // Calculate the distance in centimeters
  distance = duration * 0.034 / 2;

  // Print distance to serial monitor for debugging
  Serial.print("Distance: ");
  Serial.print(distance);
  Serial.println(" cm");

  // Check if an object is within range (example threshold is 50 cm)
  if (distance < 50) {
    // Turn on LED
    digitalWrite(ledPin, HIGH);
    // Turn on buzzer through transistor
    digitalWrite(buzzerPin, HIGH);
  } else {
    // Turn off LED
    digitalWrite(ledPin, LOW);
    // Turn off buzzer through transistor
    digitalWrite(buzzerPin, LOW);
  }

  delay(500); // Adjust delay as needed
}